To fix a running toilet, check whether your toilet tank is overfilling or leaking into the bowl, then adjust the chain or float, replace a worn seal, or repair the toilet fill valve as needed. Start with diagnosis, so you replace only the part causing trouble, and shut off the water before disconnecting anything.x
Your toilet’s sound offers a useful clue. Steady hissing points toward incoming water, while occasional refilling suggests your tank is losing water between flushes.
Before you start: Stop and arrange professional help if you find: A seized shutoff valve. Cracked porcelain. Water leaking onto your floor. A shutoff that keeps passing water after you close it.
Plumber tip: If the shutoff valve won’t turn, lifting the float shuts off the fill valve. Get the shutoff replaced as well. (Terry Love forum staff)
What Is Causing Your Toilet to Keep Running?
Identifying the causes of a running toilet starts with understanding how the components work together inside the tank.
The most common causes of a running toilet include an incorrectly set float, a leaking flapper, or a malfunctioning toilet fill valve.
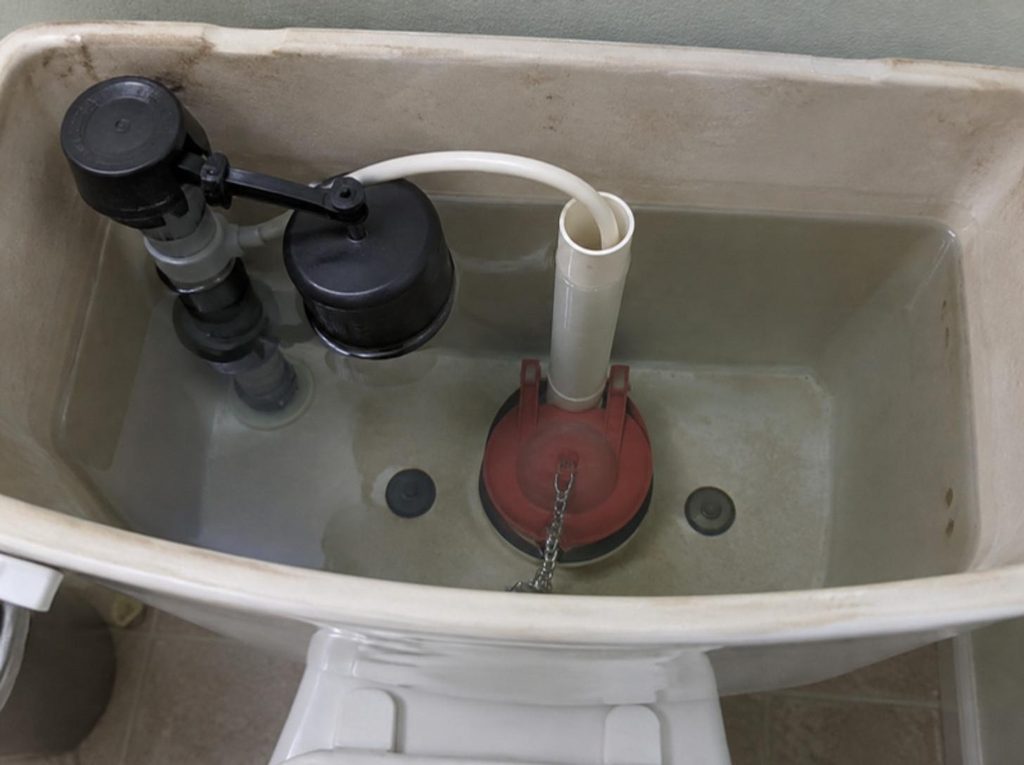
You’ll narrow down the running toilet repair by watching where water goes after your tank refills. Start with the overflow tube, the open upright tube inside your tank.
| Your symptom | Likely cause | Your next check |
| Tank water spills over the overflow tube’s rim | High float setting or faulty toilet fill valve | Check float movement and shutoff |
| Water trickles into your bowl below the overflow level | Leaking seal or damaged flush valve | Inspect the seal and test for leakage |
| Your toilet refills between uses | Slow tank-water loss | Mark the waterline and check for leaks |
| Running starts after a part replacement | Wrong fit or installation problem | Verify the part and refill-tube position |
Is Water Flowing Into the Overflow Tube?
Watch your toilet tank waterline as filling ends. Water spilling over the tube’s rim points toward a high float setting or a toilet fill valve that fails to close.
Gently lift the float through its normal travel. If that stops incoming water, check its adjustment and clearance; if water keeps flowing, inspect the toilet fill valve using your model’s instructions. Kohler says sediment in the fill valve cap is a common cause, so flush the valve first and replace it only if the toilet keeps running.
Does the Tank Lose Water Between Flushes?
Let your tank fill, close the supply valve, and mark the waterline with a pencil. Leave your toilet unused and check whether the level falls. Korky says to wait at least 25 minutes.
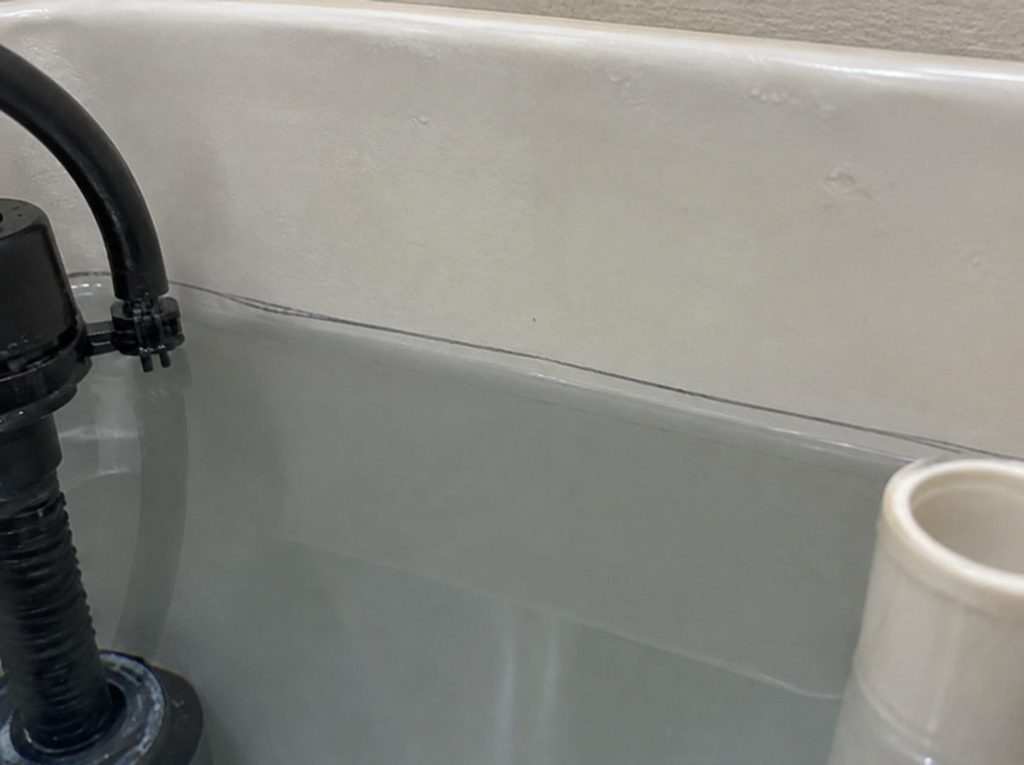
A falling level confirms water loss from your toilet tank. Check the floor and tank exterior too, because a leaking flapper is only one possible escape route. Korky says that after a couple of hours, a level stopped at the flapper points to the flapper or seal, and a drop to the overflow tube or tank bottom points to the flush valve.
What Does a Dye Test Reveal?
Add a little food coloring or a toilet leak-detection tablet to your tank water. Leave your toilet unused without flushing, and watch for color entering the bowl. EPA WaterSense says to wait 5 to 10 minutes, then flush so the dye doesn’t stain.
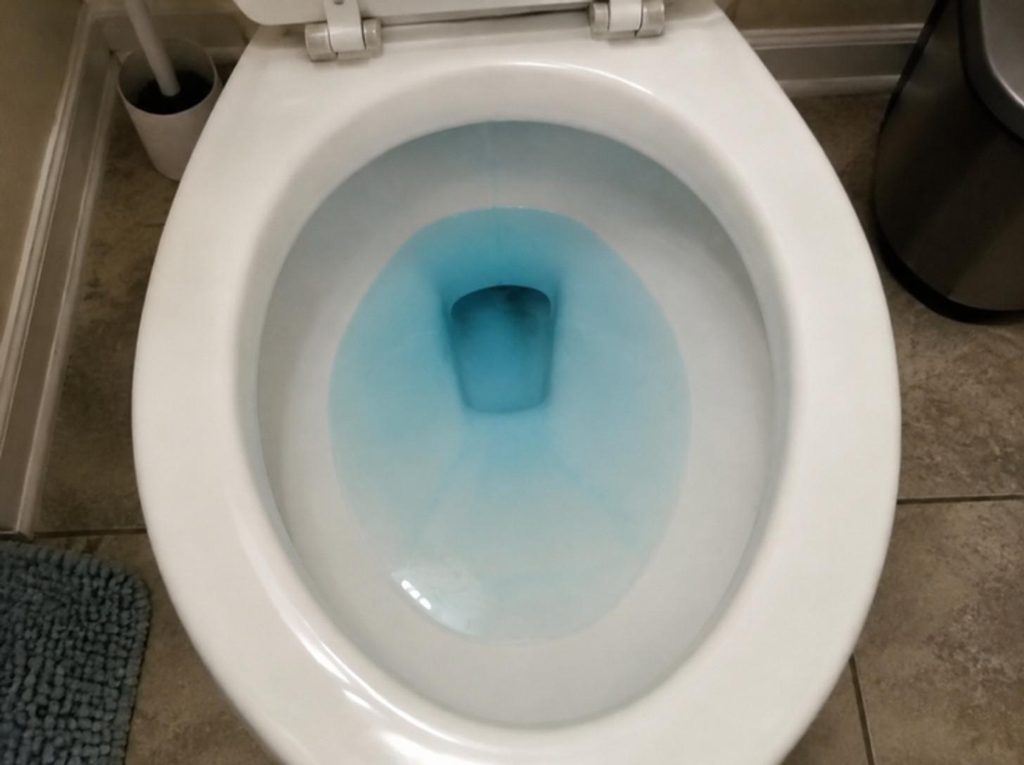
Color in your bowl confirms tank-to-bowl leakage. You still need to inspect the seal, flush valve seat, and overflow tube to locate the defect; flush afterward to clear the dye.
Which Tools and Replacement Parts Do You Need?
You need basic hand tools and a model-matched part for running toilet repair. Buy replacement parts after you identify the faulty component.
Gather Basic Tools and Leak-Testing Supplies
Keep your supplies within reach before shutting off the water:
- Adjustable wrench and screwdriver.
- Towels, sponge, and bucket.
- Gloves and a soft cloth.
- Food coloring or leak-detection tablets.
- Flashlight and phone for reference photos.
You’ll need the wrench mainly for connections beneath your tank. Use your hands for plastic fittings whenever the manufacturer specifies hand-tightening.
Match Replacement Parts to Your Toilet’s Brand and Model
Look inside your toilet tank and beneath the lid for a brand name and model number. Photograph those markings and your existing valve before shopping.
Match your toilet flapper or canister seal by model, shape, and mounting style. Check a toilet repair kit’s compatibility carefully, since “universal” does not guarantee a fit, and compare the toilet repair cost with the work your diagnosis calls for.
Follow These Steps for the Repair Your Toilet Needs
Use these running toilet repair steps as conditional branches: complete the checks that match your symptoms. Keep your supply off during disassembly, then restore it for controlled testing.
Step 1: Shut Off the Water and Drain the Tank
Close your toilet’s supply valve gently, following its operating direction. Flush and hold the handle or button as needed to drain the tank, then sponge out the remaining water.
Before disconnecting anything, confirm that incoming water has stopped. Your tank should remain empty and your work area dry.
Step 2: Adjust the Flapper Chain
Move the chain clip so your closed flapper has slight slack. Keep extra chain clear of the seal, and check that your handle returns freely. Fluidmaster recommends 1/2 inch of slack, and Kohler recommends one to two links.
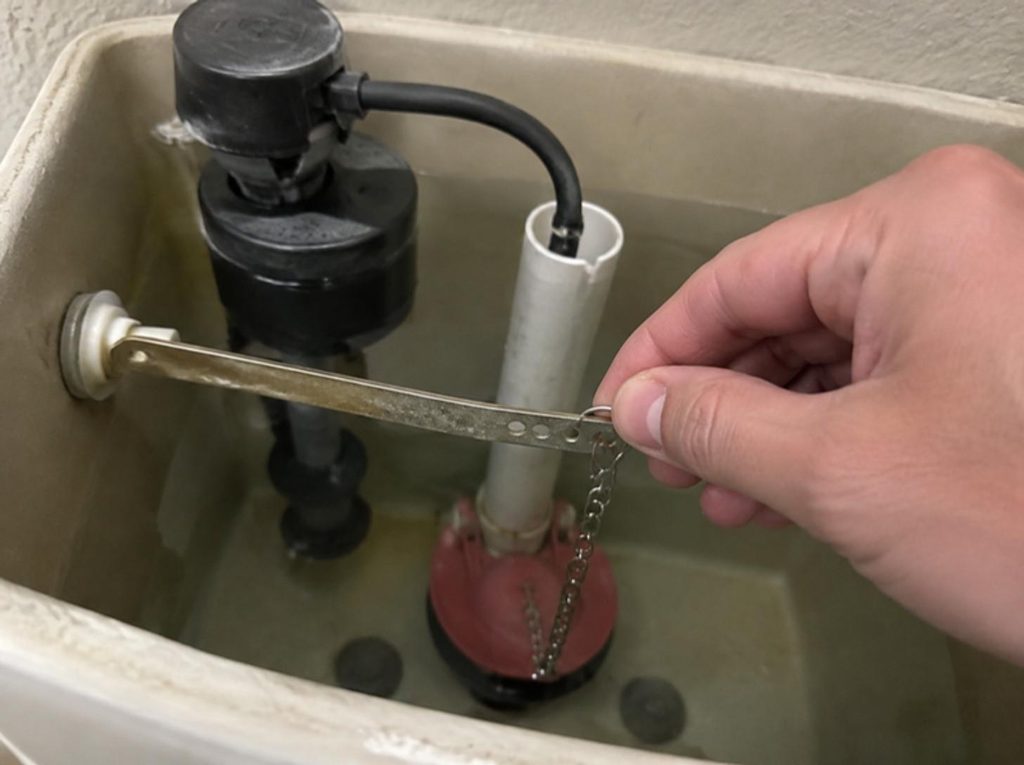
A tight chain holds the flapper open; loose links trapped underneath also cause leaks. Your flapper should rest flat and lift freely when you operate the handle.
Step 3: Clean the Flush Valve Seat
Lift your flapper and wipe the flush valve seat, the smooth rim beneath it, with a soft damp cloth. Remove grit and deposits using only cleaning methods approved for your toilet.
Avoid scraping or sanding the sealing surface. Your seat should feel smooth, with no debris beneath the closed seal.
Step 4: Replace the Worn Flapper or Canister Seal
A leaking flapper is a frequent culprit behind phantom flushing. Remove your damaged seal using the toilet manufacturer’s release method. Clip a matching toilet flapper onto its mounts, or remove the canister as directed and fit its replacement gasket.
Canister and tower systems use different locking mechanisms, so check instructions before twisting. Your new seal should sit evenly without folds, stretching, or sideways pull.
Plumber tip: On a Kohler single-flush canister toilet, ask for the yellow Class 5 seal, and use a wet vac to clear the water left in the tank first. (plumber on r/Plumbing)
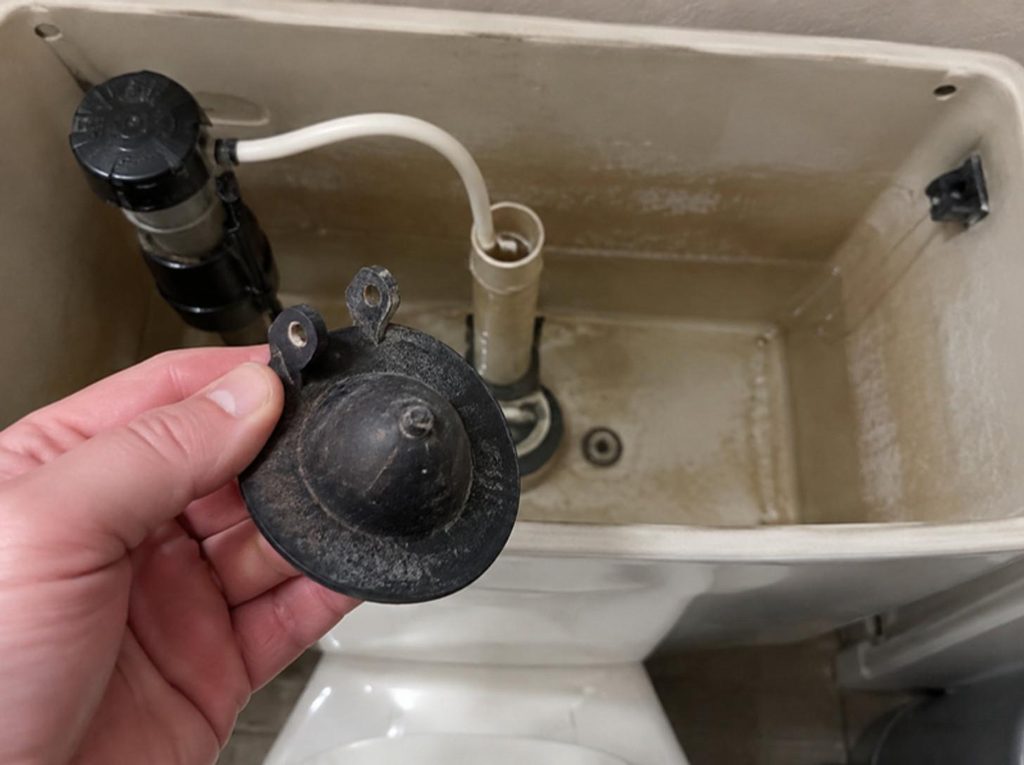
Plumber tip: After fitting a new flapper, add food coloring to the tank and wait a few minutes. If color reaches the bowl, the seat is probably bad, and a Fluidmaster Flusher Fixer kit is the repair to try. (plumber on the Fine Homebuilding forum)
Step 5: Adjust the Float Height
Move your float setting toward the tank’s marked fill line using its adjustment screw or clip. Follow your valve’s directions, since adjustment direction varies between designs.
Keep the float clear of your tank wall and nearby parts. During a controlled refill, your water should stop at the specified line below the overflow rim.
Step 6: Replace a Faulty Fill Valve
With your supply off and tank drained again, place a bucket beneath the connection, disconnect the supply line, and remove the fill valve’s retaining nut. Install the compatible replacement toilet fill valve with its supplied gasket and height settings, following its instructions.
Keep the valve’s critical-level mark at the manufacturer-required height above the overflow tube, and tighten connections as directed. Your valve should stand secure with free float movement and dry connections after testing.
Step 7: Secure the Refill Tube
Clip the small refill tube, also called the fill tube, into its approved holder at the overflow tube. Follow the manufacturer’s specified air gap, and keep its outlet above the tank waterline.
Avoid pushing the fill tube deep into the overflow opening, which risks siphoning. Your tube should remain secure and direct water into the opening during refill.
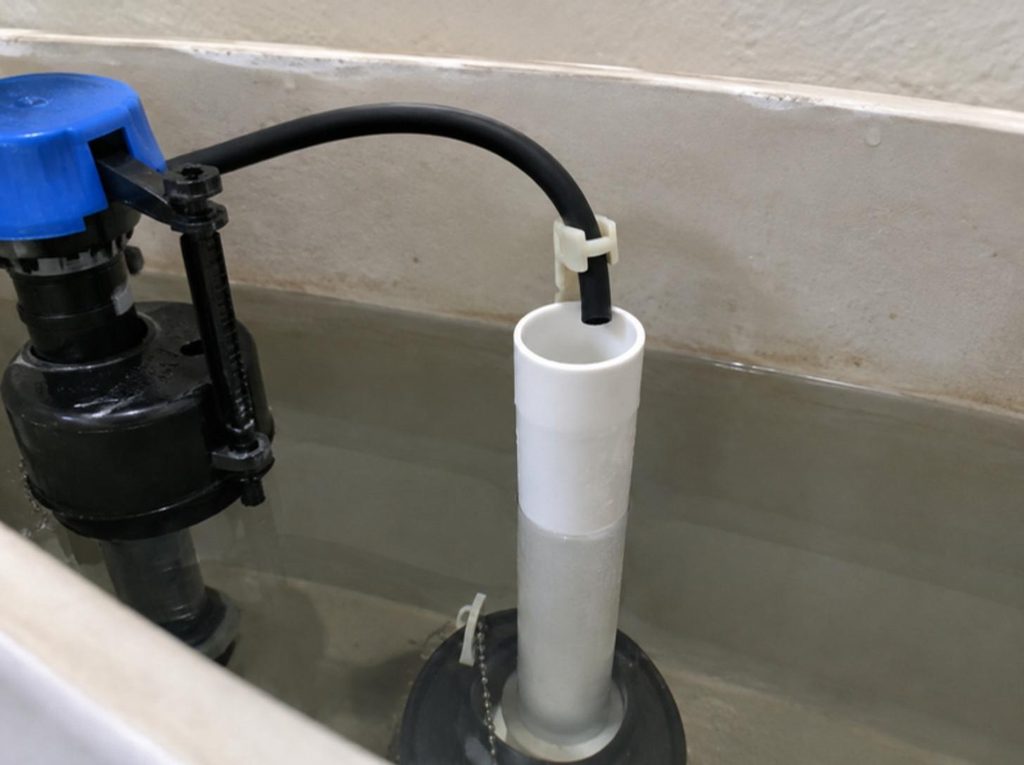
Step 8: Restore the Water and Test the Flush
Open your supply valve slowly and watch your tank fill. Check beneath the fill valve and along the supply connection with a dry tissue, then test the flush with your lid back in place.
Watch for a sticking handle or button. Your tank should refill to its marked line, shut off, and stay quiet between uses.
Why Does the Toilet Still Run After Repairs?
If your running toilet repair fails, recheck part fit and installation before buying another kit. A new component still needs the right seal, clearance, and adjustment.
Resolve the Most Common Snag: A Replacement Seal That Will Not Fit
Compare your replacement with the original part and your model’s parts information. A similar-looking flapper still needs the correct mounting style and sealing shape.
Plumber tip: The top cause of a leaking flapper is having the wrong one for the flush valve. Get the flapper made for your brand and model. (plumber on the Heating Help forum)
For a canister, check that your gasket sits fully in its groove without twisting. If gentle pressure stops the leak, inspect alignment and fit before replacing the fill valve.
Check for Remaining Leaks, Siphoning, and Damaged Components
Repeat your waterline check and dye test after installation. Use the results to investigate these remaining causes:
- Debris beneath your replacement seal.
- A chipped or damaged flush valve seat.
- A cracked overflow tube.
- A fill tube positioned low enough to siphon.
- A toilet fill valve that continues passing water.
A damaged seat or overflow tube calls for flush valve assembly repair. On many two-piece toilets, that work requires removing your tank.
Plumber tip: If the tank keeps losing water after new flappers, check the overflow tube for a crack where it’s glued at its base. Press lightly on the top of the tube in different directions and see if the leak rate changes. (master plumbers on the Terry Love forum)
Avoid Overtightening, Forced Adjustments, and Unnecessary Replacements
Protect your porcelain and plastic fittings while correcting the problem. Follow these limits:
- Tighten each fitting only as its instructions specify.
- Keep pliers off delicate adjustment mechanisms.
- Use approved replacement gaskets without improvised sealants.
- Change one setting at a time and retest.
If you find moisture at a connection, close your supply and inspect its gasket and alignment. Extra force risks damaged threads or cracked porcelain.
When Should You Call a Plumber?
Knowing when to call a plumber helps you avoid escalating minor plumbing troubles into costly water damage. You should call a plumber for a running toilet when you cannot isolate the water safely or when damaged components exceed your repair skills. Persistent running after careful testing also deserves professional diagnosis.
Stop for a Seized Shutoff, Cracked Tank, or External Leak
Stop work and arrange help when you find:
- A shutoff that resists normal hand pressure.
- A visible crack in your tank.
- Water escaping onto your floor.
- A leaking supply connection that persists after correct assembly.
Keep your toilet unused if its porcelain is cracked. If water is escaping and the local shutoff fails, use your home’s main water shutoff only if you know its location and can operate it safely.
Get Help When Internal Repairs Do Not Stop the Running
Give your licensed plumber the toilet model and a clear account of your tests. Mention whether the dye reached your bowl and whether water crossed the overflow rim.
That information helps focus the repair. Ask about model-specific parts and any local permit requirements if the work extends to valve replacement or new toilet installation.
Wise Workman scores local plumbers on real homeowner reviews, and nobody can pay for a higher rank.
Confirm the Tank Refills and Stays Quiet
Your running toilet repair is complete when your tank fills to its specified line, shuts off fully, and holds water between flushes. Confirm that your bowl refills properly and every disturbed connection stays dry.
Check again after your toilet has sat unused. Add a quick tank inspection to your home maintenance checklist so you catch renewed trickling or occasional refilling early.
Frequently Asked Questions
You can handle many toilet repairs through the tank opening when you have compatible parts and a working shutoff. Your flush mechanism determines which seal and release method you need.
What is the most common cause of a running toilet?
Your first suspect is a flapper that fails to seal after flushing. Check its chain and sealing surface before replacing it.
How do you fix a running toilet without a flapper?
For your flapperless gravity toilet, inspect the canister or tower gasket and replace it with the correct seal if worn. If you have a pressure-assisted toilet, follow its model-specific service instructions or arrange professional help.
How do you fix a running toilet with a push-button flush?
Check that your push button releases fully and allows the flush valve to close. If your toilet runs only with the lid installed, check button-rod or cable adjustment against your model’s instructions.
Can you fix a running toilet without removing the tank?
You can complete chain adjustments, seal replacement, and many fill valve repairs without removing your tank. A damaged flush valve assembly often requires tank removal on a two-piece toilet.
Can I temporarily stop a running toilet by turning off the water?
Yes, closing your toilet’s water supply valve stops incoming water temporarily. Water already in your tank will continue leaking into the bowl until it reaches the leak’s level, and your tank will stay empty after flushing.