How to Fix a Scratched Wood Floor (Concealing, Sanding and Refinising)
How to Fix a Scratched Wood Floor (Concealing, Sanding and Refinising)
Author: Howard Griner | Updated on December 23, 2023
Wood floors are known for their timeless beauty and durability, but they are not impervious to scratches and wear. Scratches can mar the appearance of your wood floors and, if left unattended, may compromise their longevity.
Wondering how to fix a scratched wood floor?
In this article, we'll delve into the topic of repairing wood floor scratches and answer any questions you may have regarding scratch removal, floor durability, and the importance of fixing scratches while highlighting the significance of addressing scratches promptly to preserve the floor's appearance and overall durability.
Key Takeaway
Use wood floor markers, crayons, or fillers for minor scratches.
Use a wood marker for shallow, a crayon for wider, and filler for deeper scratches.
Sanding and refinishing are required for deep scratches.
Systematically sand from coarse to fine grits for a smooth surface.
Use the right product based on scratch depth.
Apply multiple coats of wood finish, allowing proper drying and sanding between coats.
Regularly clean to prevent dust and debris accumulation and conduct periodic inspections for newer scratches.
Assessing the Damage on the Wood Floor
Identifying Scratch Depth
Inspecting the Floor Finish
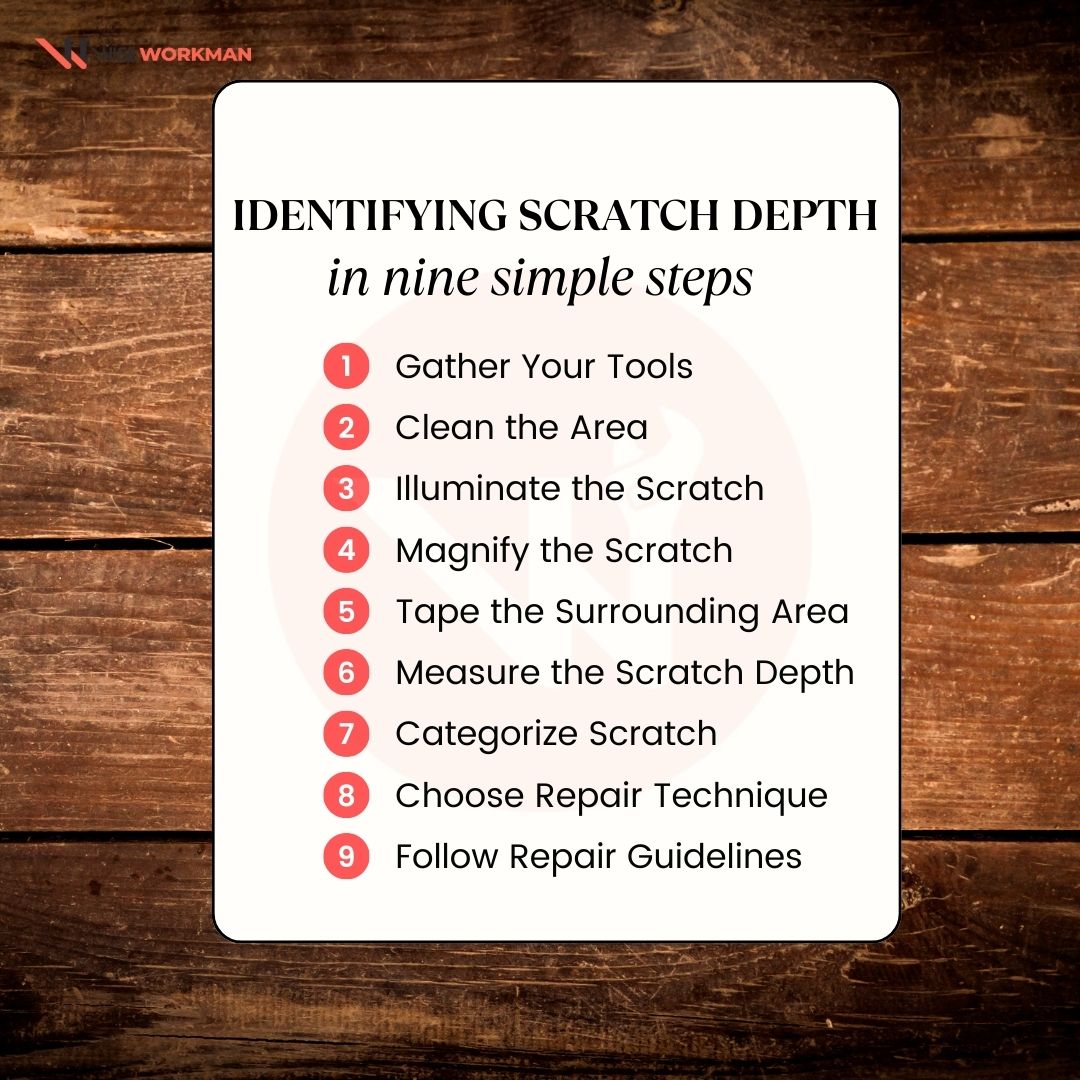
1. Identifying Scratch Depth
Wooden floors are generally chosen when designing a room because they add warmth and elegance to a space. However, if scratches appear on the surface of a wooden floor, its beauty is severely damaged.
How can we restore a scratched wood floor?
To effectively and efficiently restore your wood floor, you must accurately assess the depth of the scratch before choosing an appropriate method for undertaking the repair.
Let us walk you through the different steps you will need to undertake to evaluate the severity of a scratch and determine a repair technique.
Gather Your Tools: The very first step before starting the assessment of scratch depth is to gather tools that we have listed below for your ease:
Bright flashlight or work light
Magnifying glass
Painter's tape
Ruler or calipers
Wood putty or filler (varies based on repair method)
Clean the Area: Next, you must ensure that the scratched area being assessed is spotless, freeing from dust and debris. This will ensure that you can see the scratch.
Illuminate the Scratch: Using either a flashlight or work light, you can look at the scratch more clearly, which is essential for a detailed evaluation.
Magnify the Scratch: A magnifying glass will examine the scrape more closely. This stage will reveal finer details that might not be visible to the naked eye.
Tape the Surrounding Area: Painter's tape can create a border around the scratch and prevent any unintentional harm while the scratch is being evaluated.
Measure the Scratch Depth: To determine the extent of the scrape, use calipers or a ruler. Slide the measurement device over the scratch gently while holding it perpendicular to the floor. To ensure accuracy, take many readings along the length of the scratch.
Categorize Scratch Severity: You can categorize your scratches into the following severity levels based on your measurements:
Shallow: Scratches that are barely perceptible or have a depth of less than 1/32 inch (1 mm).
Moderate: Scratches with a depth between 1/32 inch (1 mm) and 1/16 inch (2 mm).
Deep: Scratches with a depth exceeding 1/16 inch (2 mm).
Determine the Repair Technique: Once you've determined how severe the scratch is, pick the best repair strategy:
Shallow Scratches: Minor surface nicks can frequently be repaired with a quick touch-up using a scratch concealer or wood floor cleaner.
Moderate Scratches: The damaged area might need to be sanded and refinished.
Deep Scratches: Before sanding and refinishing, consider repairing deep scratches with epoxy filler or wood putty.
Follow Repair Guidelines: Follow the instructions for surface cleaning, sanding, filling, and refinishing according to the chosen repair technique to bring the wood floor back to its prior beauty.
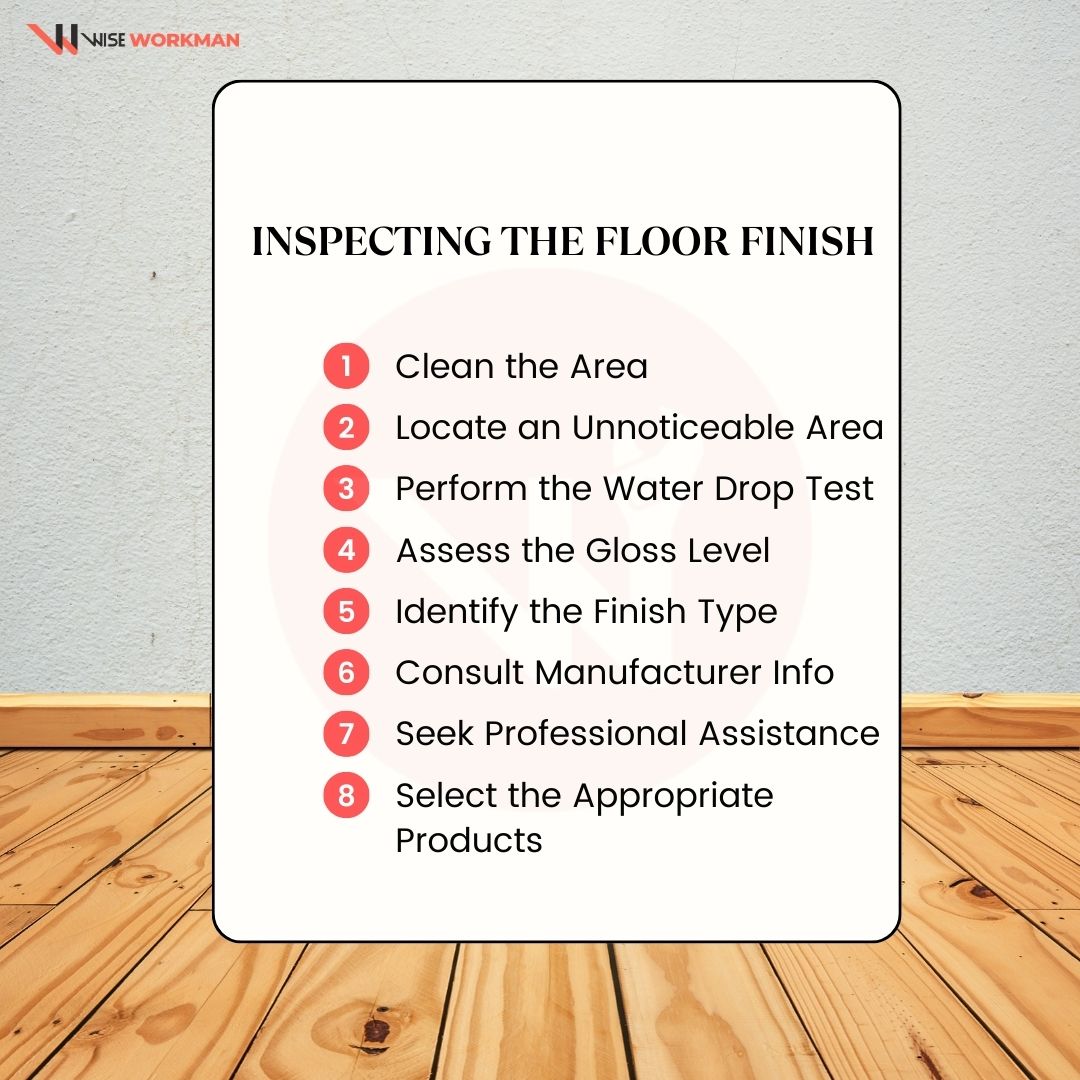
2. Inspecting the Floor Finish
What does it take to repair a scratched wood floor? The first essential step is identifying which type of finish or coating is used on the floor. Different finishes require specific products and techniques for successful scratch repair.
It is important to choose the right products and techniques for scratch repair.
1.Clean the Area: Thoroughly clean the scratched area to remove dirt, dust, or debris. This step ensures a clear view of the floor finish.
2. Locate an Inconspicuous Area: Find a small, unnoticeable section of the wood floor where you can conduct a finish identification test without incurring noticeable damage, such as a corner or behind furniture.
3. Perform the Water Drop Test: The water drop test is a simple way to determine the type of finish on your wood floor. To perform the test, place a few drops of water on the chosen area and observe the reaction:
A polyurethane or other water-resistant coating is most undoubtedly present if water droplets bead up and do not pierce the surface.
It might have an oil-based finish if the water is absorbed and leaves a dark mark on the wood.
4. Assess the Gloss Level: Observe the shine or gloss level of the finish in the test area. It can be categorized as:
High Gloss: Reflective and shiny.
Semi-Gloss: Moderately shiny.
Satin: Slightly shiny.
Matte: Dull and non-reflective.
5. Identify the Finish Type: You can infer the type of finish applied to your wood floor based on the results of the water drop test and gloss level.
6. Consult Manufacturer Information: Verify any manufacturer information or paperwork that was included with the floor, if any is available. It could include information on the finish type and suggested maintenance items.
7. Seek Professional Assistance: Consider speaking with a qualified flooring specialist or contractor if you need help or are unsure of the finish type.
8. Select the Appropriate Products and Procedures for Scratch Repair: After determining the finish type, pick the appropriate tools and methods for scratch repair:
Polyurethane Finish: Use a polyurethane scratch repair kit or individual products designed for polyurethane finishes.
Oil-Based Finish: Select products suitable for oil-based finishes, such as appropriate wood oils or wax fillers.
Gloss Level: Match the gloss level of the repair product to the existing finish for a seamless result.
DIY Wood Floor Scratch Repair (Step-by-Step)
Concealing Minor Scratches
Sanding and Refinishing
1. Concealing Minor Scratches
Even though minor scratches on your wood floor can be unsightly, they don't necessarily need to be repaired thoroughly. By using fillers, crayons, or wood floor markers, you can quickly cover up these imperfections.
Let's walk you through the process of hiding those minor scratches and restoring the beauty of your wood floor.
Here are the materials you'll need:
Wood floor marker, crayon, or filler (matched to your floor color)
Clean, lint-free cloth
Mild wood floor cleaner
Fine-grit sandpaper (if needed)
Step 1: Purge the Area: Make sure the scratched area is clean and free of dust or grime before you start. Wipe the scratched area gently with a moderate wood floor cleanser and a clean, lint-free cloth. Give it time to dry.
Step 2: Choose the Right Product: Select the appropriate product for concealing the scratch:
Wood Floor Marker: Ideal for minor, shallow scratches. Choose a marker that closely matches your floor's color.
Wood Floor Crayon: Similar to markers but in crayon form. They are suitable for slightly wider scratches.
Wood Floor Filler: Use wood floor filler for deeper scratches or gouges. Make sure to pick a filler that matches your floor color.
Step 3: Put marker, crayon, or filler on the page: Depending on the product you've selected, follow these instructions:
Using Wood Floor Marker:
Shake the wood floor marker before use to make sure the ink is evenly distributed.
Following the direction of the wood grain, lightly and evenly color over the scratched area with the marker.
The suggested drying time for the marker can be found on the product label.
Using Wood Floor Crayon:
Apply a little pressure while gently rubbing the crayon over the scratch to fill it in.
To blend the crayon with the surrounding wood, buff the area with a clean, lint-free cloth.
For proper drying, allow it to sit for a while.
Using Wood Floor Filler:
Squeeze a tiny amount of filler onto a plastic scraper or a putty knife.
Ensure the filler is slightly elevated above the surface, and gently press it into the scratch or gouge.
The recommended drying period for the filler is often a few hours or overnight.
When the filled area is dry, use fine-grit sandpaper to sand it until the surrounding floor is level carefully.
Step 4: Finished touches: Examine the mended area closely after using the marker, crayon, or filler. To get the desired coverage, repeat the procedure as necessary. Take your time and be patient to create a smooth finish.
Step 5: Maintain and clean the entire floor surface to get rid of any leftover debris or extra product when the repair is finished. Regular cleaning and avoiding abrasive products in the future will help you maintain your wood floor.
2. Sanding and Refinishing
Although deep scratches on wood floors can be ugly, you can restore their natural beauty with the appropriate method. Deep scratches can be effectively removed from floors using sanding and refinishing processes, which also restore their aesthetic appeal.
In this section, let us walk through the process of repairing deep wood floor scratches through sanding and refinishing.
Here are the materials and tools you'll need:
Drum or orbital floor sander
Edge sander
Sandpaper (various grits: coarse to fine)
Vacuum cleaner
Wood filler (if needed)
Stain (optional)
Wood finish (polyurethane, varnish, or oil-based finish)
Paintbrush or roller
Tack cloth
Respirator mask
Safety glasses
Ear protection
Knee pads
Step 1: Clean up the area: Remove all of the room's furniture, rugs, and obstructions. By opening windows and doors, you can ensure appropriate ventilation. Put on the necessary protective clothing, such as a respirator mask, safety glasses, and ear protection.
Step 2: Evaluate the damage: Recognize the extensive gouges and scrapes on your wood floor. Before sanding, ascertain whether any repairs, such as plugging holes or gaps, are required.
Step 3: Sanding: Using the coarsest sandpaper grit on the drum or orbital floor sander. Working with the wood grain, sand the entire surface. To avoid uneven spots, make careful to overlap your passes.
To get a smoother surface after using the coarse grit, go to progressively finer grits (medium and fine). Once you've eliminated all deep scratches and produced a uniform, smooth surface, keep sanding the entire floor.
Use an edge sander to reach corners and edges that a drum or orbital sander couldn't.
Between sanding passes, vacuum the entire floor to get rid of any dust or debris.
Step 4: If necessary, plug any holes or gaps: Fill any holes or gaps in the wood with wood filler that matches the color of your floor, if there are any. After the filler has dried, smooth it out with a sander.
Step 5: Staining is possible: Follow the manufacturer's recommendations when applying a wood stain to your wood floor if you wish to modify the color. Let the stain completely dry.
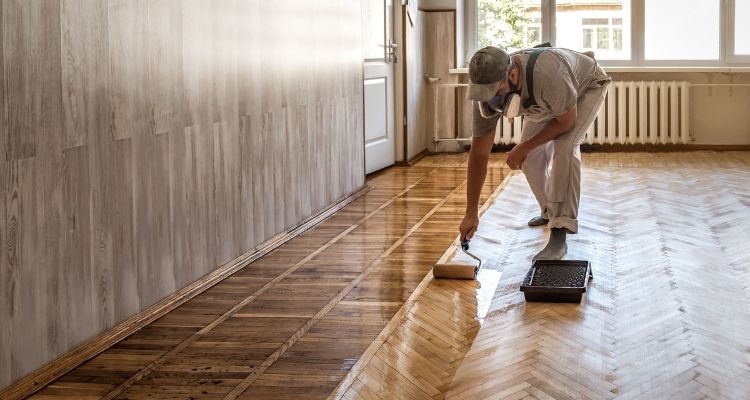
Step 6: Applying the Finish: Apply a thin, even coat of your preferred wood finish (polyurethane, varnish, or oil-based finish) using a clean, dry paintbrush or roller. Work with the wood's natural grain.
As directed by the manufacturer (often several hours), let the first coat dry. To remove flaws, lightly sand the dry coat with fine-grit sandpaper.
As you continue to apply coats, lightly sand between each one until you reach the desired finish. Three coats are typically enough.
Step 7: Finishing up: Use a tack cloth to wipe away any remaining dust or debris once the finish has dried. After the advised curing period has passed, only replace furniture and carpets.
Step 8: Recurrent Upkeep: Maintain your wood floor by washing it frequently and protecting furniture's feet using floor protectors to keep it looking its best.
Professional Wood Floor Repair
Hiring Floor Refinishing Services
Hiring skilled floor restoration services can be a smart move if your wood floor has extensive or complicated scratches that need expert treatment.
Let us explore the benefits of turning to skilled professionals to handle complex scratch repairs and floor refinishing.
1. Expert Scratch Repair:
Professional floor refinishers have significant training and experience in dealing with all kinds of floor damage, including deep scratches. Their knowledge enables them to select the best repair methods and precisely assess the damage.
Specialized Sanding Equipment: Professionals may use specialized sanding tools to remove deep scratches precisely and effectively without further damaging your floor.
2. Quality Materials and Products:
Professionals have access to high-quality wood treatments, stains, and sealants that may not be easily accessible to consumers. This ensures a superb and durable result.
Proper Product Selection: They are skilled in choosing the best products to suit the requirements of your floor, resulting in a smooth and attractive finish.
3. Time and Cost Efficiency:
Faster Turnaround: Professional refinishers work swiftly and can finish the job more rapidly than a do-it-yourself effort. Your regular life will be disrupted less as a result.
Cost-Effective: Although employing specialists may first appear like an additional investment, it may end up being so in the long run. Because of their experience, they are less likely to make expensive mistakes, and the finished product frequently lasts longer, requiring less regular refinishing.
4. Customized Solutions:
Tailored Approach: To build a specific restoration strategy, experts evaluate the unique qualities of your wood floor, including the wood type, finish, and condition. This ensures that the repair and restoration process is customized to the unique requirements of your floor.
Color matching: They are skilled in blending mended areas with the rest of the floor to get a seamless, consistent look.
5. Dust Containment:
Several professional floor restoration firms provide dustless sanding choices to preserve a cleaner and healthier indoor atmosphere while the floor is being refinished.
6. Guaranteed Results:
Guarantees and Customer Satisfaction: Reputable experts frequently offer warranties on their services, providing you with confidence that the work will be done correctly. Additionally, they are more likely to guarantee that you will be delighted with the result.
7. Comprehensive Restoration:
Beyond Scratch Repair: Professionals may take care of additional problems, such as minor dents, gaps, or uneven regions, throughout the refinishing procedure, offering a thorough restoration of your wood floor.
Preventive Measures to Avoid Scratches and Floor Damage
Area Rugs and Floor Protectors
Preventative steps are essential for keeping your wood flooring in perfect condition and reducing future scratches.
Let's look at practical advice for protecting your wood floor from harm and maintaining its finest appearance, such as utilizing area rugs and floor protectors.
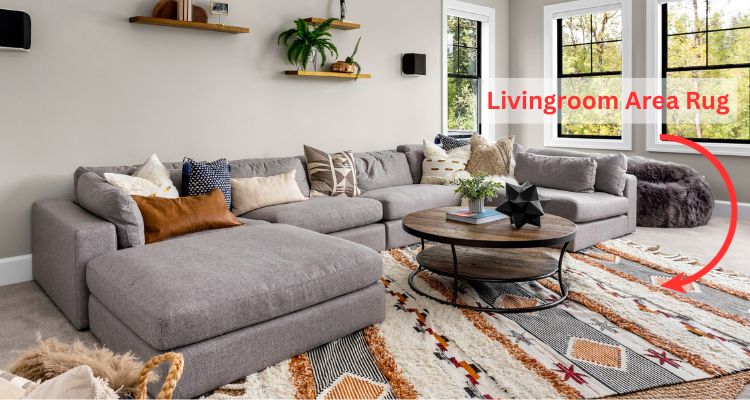
1. Invest in Area Rugs:
Strategic Placement: Place area rugs or runners in high-traffic areas, such as lobbies, foyers, and living rooms. These rugs serve as a physical barrier between people and your wood floor, lowering the possibility of scratches.
Rug Padding: To stop area rugs from swaying and bunching up, place rug pads underneath them. This improves safety while also safeguarding your floor.
2. Floor Protectors for Furniture:
Furniture pads: Attach felt or rubber furniture pads to the legs of heavy furniture, such as chairs, tables, and sofas. By cushioning the floor, these mats stop moving furniture from damaging the surface.
Casters with Care: To prevent wheel-related damage, choose soft, non-marking casters made for wood floors if your furniture has casters.
3. Regular Cleaning and Maintenance:
Clean your wood floor by routinely sweeping or vacuuming to get rid of dirt and debris. Over time, scratches can be produced by abrasive particles.
Cleaning your floor with a damp mop and a wood floor-friendly cleaner. Avoid using too much water since prolonged contact with moisture can damage wood.
Spills should be cleaned up right once to avoid water damage or stains. Accidents do happen.
4. Rotate Furniture Periodically:
To ensure that the wear and tear is distributed equally throughout the floor, occasionally move your furniture. This avoids a single spot getting too many scratches.
5. Area Rug Maintenance:
Periodically remove the area rug and clean underneath it to keep dirt and debris from building up.
6. Routine Floor Inspection:
Check your wood floor frequently for wear, dings, or damage. Any problems should be resolved right away to avoid them getting worse.
Regular Cleaning and Maintenance
You need to do more than clean your wood floors sometimes to ensure their beauty and durability. To keep your wood floors in top condition and stop new scratches from forming, routine floor cleaning and upkeep are vital.
Keep reading to find out the value of a regular cleaning schedule and maintenance procedures to keep your wood floors free of scratches.
1. Dust and Debris Prevention:
Regular sweeping or vacuuming gets rid of the dirt, dust, and other junk that can scratch the surface of your wood floor. The secret to avoiding scratches is preventing the accumulation of these particles.
2. Sweeping and Vacuuming:
Set up a schedule to sweep or vacuum your wood floors at least once a week or more frequently in areas with a lot of traffic. To prevent scratching, sweep with a soft-bristled broom or use a vacuum with a hardwood floor setting.
3. Gentle Mopping:
Use a damp mop and a cleaner designed especially for wood floors for a deeper clean. Use sparingly since too much water might cause the wood to warp or become damaged if it seeps into seams.
4. Prompt Spill Cleanup:
Accidents sometimes occur, but quick spill cleaning is essential. Leftover liquids can damage the wood by penetrating it and causing swelling, stains, or other issues.
5. Protective Mats and Rugs:
Use doormats at the entrances to catch mud and grit tracked in by shoes. Place runners or area rugs in high-traffic areas to prevent foot traffic from scratching your wood flooring.
6. Felt Furniture Pads:
Attach felt or rubber padding to the legs when moving or rearranging furniture to prevent scratches. Replace worn pads regularly.
7. Avoid High Heels and Hard-Soled Shoes:
Encourage family and guests to remove or avoid wearing high heels and shoes with rugged soles indoors to prevent surface scratches.
8. Pet Care:
If you have a pet, make sure to regularly trim their nails to reduce the chance of scratching. Put pet-friendly carpets or mats where your animals congregate.
9. Sunlight Protection:
By covering your windows with blinds or drapes, you may shield your wood flooring from UV radiation. Uneven aging and fading can be brought on by direct sunlight.
10. Routine Floor Inspection:
Check your wood floors occasionally for signs of wear, dings, or damage. Any problems should be resolved right away to avoid them getting worse.
Conclusion
Let us give you a wood floor scratch-fix recap!
Maintaining the beauty and longevity of your wood floors involves a combination of prevention, routine maintenance, and prompt scratch repair.
Some closing recommendations and key takeaways on prevention and maintenance are as follows:
Have regular inspections
Make sure to have professional maintenance
Have long-term investment in their longevity, beauty, and the overall value of your home.
Enjoy Your Wood Floors
Incorporating these preventive measures, regular maintenance, and prompt scratch repair will not only preserve the pristine appearance of your wood floors but also extend their life, making them a source of enduring beauty in your home.
 Author: Howard Griner | Updated on December 23, 2023