How to Adjust Cabinet Hinges: A DIY Guide
 Author: Howard Griner | Updated on February 28, 2024 Author: Howard Griner | Updated on February 28, 2024
Did you know that cabinet hinges can make or break your cabinet doors?
In our DIY guide, you will learn the best materials you can use for cabinet hinge adjustment and why it is vital to the cabinet’s functionality. We will teach you how to adjust cabinet hinges in simple steps that are easy to follow.
Cabinet hinges appear to be unimportant and inconspicuous. However, it is these that determine how creaky your cabinets are, or how quickly they will fall apart. Be it the cabinet doors in kitchens or bathrooms, you need it to function smoothly so it does not impact your daily routine.
An understanding of cabinet hinge adjustment equips you with the knowledge and skills required to carry out an urgent repair if needed. This not only maintains the cabinet’s structural support but is also responsible for its aesthetic appeal in your living spaces.
Let’s get started with our guide on cabinet door hinge adjustment.
Over time, you will notice that your cabinet doors have started sagging or shifting from their original position. This does not mean that the cabinet doors or hinges need replacement. It is simply an indication that it is an alignment issue.
Imagine waking up early in the morning to make coffee, and you are surprised with a cabinet door in your hand. The cabinet door alignment issue can become a serious issue as it hinders the smooth opening and closing of cabinets. There is always a risk of the cabinet door falling out while closing or opening it.
Other reasons to adjust cabinet hinges include a poorly functioning cabinet hinge is an added source of noise. It disrupts the peaceful living environment with constant creaks and squeaks.
A well-adjusted cabinet hinge ensures that the door sits perfectly in its frame, preventing it from rubbing against it. This will prevent the hinge and cabinet door wood from premature wearouts.
It is wise to address the alignment issues as quickly as possible. Lazying around can cause the hinge to break. You will end up spending more on buying a new hinge and possibly, a cabinet door as a result of long-term damage.
Before you learn how to adjust kitchen and bathroom cabinet doors, you need essential tools for cabinet hinge adjustment. Without essential tools for cabinet hinge adjustment, the hinge repair will not last long enough. Thus, follow our list and invest in a DIY hinge adjustment kit for your home.

Your cabinet hinge toolkit should include the following:
Without adequate and strong materials, adjusting cabinet door hinges is impossible. This is what you should keep in your kit:

Before starting the process of adjusting cabinet hinges, you should spend time understanding cabinet hinge varieties and the anatomy of the hinges in household kitchens.
You should know the type of hinges and the anatomy of the hinges used in your home.
The key components of a cabinet hinge include a hinge cup that attaches to the cabinet door. The hinge arm is the part of the hinge that attaches to the cabinet frame. The pin of the hinge holds it together. The hinge pin or knuckle allows the cabinet door to rotate.
There are six main types of cabinet hinges used in kitchen cabinets.
Also known as the European Hinges, these are the most popular hinges for modern kitchen cabinets. They are so-called because they are hidden unless the cabinet door is opened, giving the door a sleek design. It is, therefore, the furniture makers’ go-to choice.
Concealed hinges have adjustment screws that allow you to easily dismantle it and tweak the door's position vertically and horizontally. You can fine-tune the alignment and choose the size of the hinge according to the cabinet’s frame.
Butt hinges are mechanical hinges that use two leaves and a knuckle, held together by a pin. These are visible when the cabinet door is closed, as they are mounted on the outside. They are also known as mortise hinges and are popular for their durability.
Butt hinges are typically preferred to support heavier loads and cabinet doors. Adjusting butt hinges is easy. Simply tighten and loosen the screws on the hinge plates to control the door's positioning.
Inset hinges are similar to butt hinges but are designed for cabinet doors that are flush or set inside within the cabinet frame. They are often chosen for a traditional look. Inset hinges are commonly used in glass doors in kitchen cabinets.
Overlay hinges come in two different styles, a full overlay and a half overlay.
A complete overlay hinge is used for cabinet doors that completely cover the cabinet frame. Whereas, half hinges leave 1/2 to 3/4 inches of the cabinet unconcealed and form a visible frame.
Kitchen cabinets should be necessarily equipped with a mechanism that automatically closes the cabinet door when it is pulled to a certain point and released. These are convenient for leaving doors ajar if you have your hands full.
Self-closing hinges have the mechanism of a conventional with an added spring. This closes the cabinet door once pushed back. Maintaining the hinges is easy with oiling and ensures the durability of the door.
These hinges are designed to close the cabinet door gently and silently and provide a controlled and cushioned closing motion.
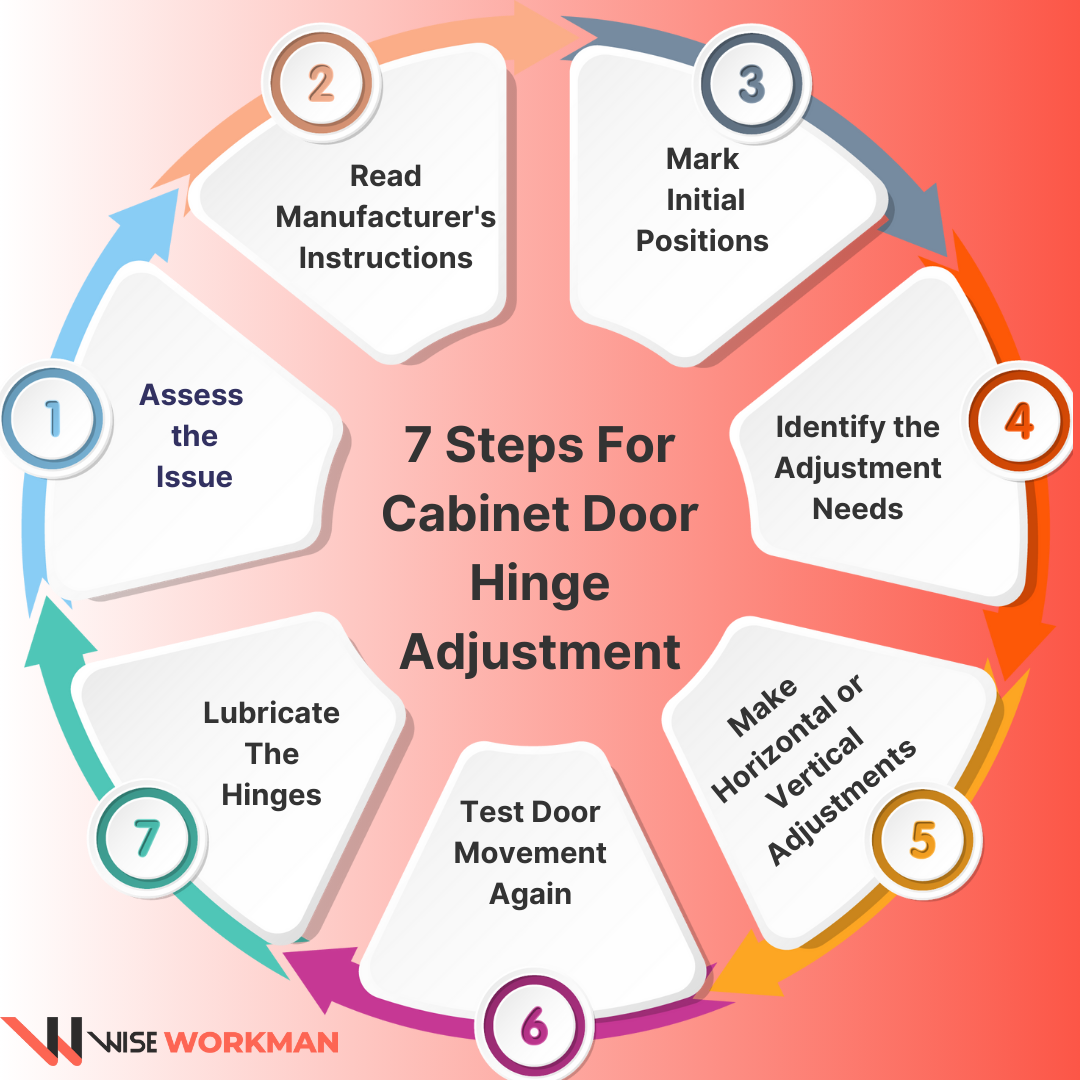
Once you have collected the tools and material, it is time to adjust the cabinet hinges. Follow our step-by-step instructions to achieve a smooth finish.
Examine the cabinet door and hinge to identify the specific problem. Is it an issue of misalignment, a sagging door, or a door that does not close softly or properly?
When you purchase a cabinet hinge, refer to the manufacturer's instructions that came with it. These provide specific guidance for adjusting the type of hinge you have chosen.
Next, it is time to identify where the placement has to be. For this, use a pencil or masking tape to mark the current positions of the hinges, screws, or plates. This ensures that readjusting the hinge is in its original position..
Based on your assessment, determine whether you need to adjust the hinges vertically, horizontally, or in terms of depth.
If you need to adjust the door vertically to raise or lower it or horizontally to move it left or right, locate the vertical and horizontal adjustment screws on the hinge or hinge plate. Then, use a screwdriver to turn the adjustment screws clockwise to raise the door or counterclockwise to lower it.
After making adjustments, repeatedly open and close the cabinet door to check for smooth operation and proper alignment.
If your hinges have moving parts that seem stiff or noisy, consider applying a silicone-based lubricant to keep the mechanism operating smoothly.
Although a DIY cabinet adjustment project can save the cabinet door from falling apart, it requires excessive precision and accuracy. If the hinges repeatedly fall out of place despite repairing them, it is a sign that you need to hire a professional to do the job.
Professionals have access to specialized tools and equipment which can be used to precisely adjust hinges. You can expect them to produce the highest quality of work as they take into account factors like the type of hinge, door weight, and frame construction.
If you are adjusting the cabinet hinges yourself, you need to keep a few things in mind that will help you achieve a smooth finish. We have the best cabinet hinge adjustment tips that will give the cabinets a smooth finish.
Follow the manufacturer's guidelines for your specific cabinet hinges. You should know how the soft close mechanism operates for different hinges.
Adjust one hinge at a time to prevent misalignment or gaps between cabinet doors. Keep in mind, that soft close hinges are sensitive to weight distribution. So, only make gradual changes to screws or hinge plates and test the door's movement after each adjustment.
When setting up cabinet hinges, we tend to make common mistakes that are simply avoidable. Steer clear and avoid cabinet hinge adjustment errors to save yourself from frustration.
Inaccuracy in setting up the cabinet hinges arises from neglecting the manufacturer's instructions while adjusting the specific hinges. Additionally, if you rush through the adjustments and make hasty changes, it can result in over-tightened or loosened hinges. This causes the cabinet doors to be very tight.
The door may drop or it may be pulled away from the hinge while tightening screws because of its weight. Soft close hinges are also very sensitive to weight distribution, defeating the purpose of adjustment. Place a support stool under the cabinet door to fix the hinge and maintain precision.
Remember to double-check your work and test that the cabinet doors close smoothly with an intact soft close mechanism function.
Maintaining the cabinet hinges is vital to the aesthetic outlook of the cabinets in kitchens, bathrooms, and living rooms. Cabinet doors that align seamlessly with the frame and maintain even gaps. Thus, knowing how to adjust cabinet hinges contributes to the overall outlook.
Besides this, the routine use of the cabinets demands hinges that can last long and bear the rough use. This can achieved if you invest in well-adjusted hinges to ensure that cabinet doors open and close smoothly.
However, cabinet hinges are prone to damage and need the necessary upgrades and replacement from time to time. You will also learn the different types of cabinet hinges, and the ones best suited for the purpose.
With the right tools and materials, following the step-by-step instructions in our guide will help you make minor adjustments and replacements yourself. The correct hinge adjustments prevent doors from sticking, rubbing, or sagging, thereby extending the life of your cabinets.
If you have tried to adjust cabinet hinges multiple times and it has not solved the issue, then it is time to hire professionals who can provide expert assistance. Instead of taking it as a DIY project, the experts with careful attention to detail and the right tools can save you from costly purchases.