Many of us find ourselves wondering how to change the electrical outlet in our homes. Here is a step-by-step guide that will help you figure out this process easily.
For the electrical work and system in your home to remain secure and effective, it is crucial to comprehend electrical outlet safety and replacement. Our everyday lives depend on outlets to power the electronics and appliances we use.
The replacement of outlets is a required home repair project since they might wear out, get damaged, or pose safety issues over time. Making sure you can replace an outlet safely and effectively is not only practical, but it is also part of home improvement.
With this information, you are better equipped to fix problems and will have a better understanding of electrical outlet replacement as and when the need arises — whether they include damaged outlets, old wiring, or a shortage of outlets—improving the efficiency and dependability of your electrical infrastructure.
Key Takeaways
Before changing an electrical outlet, prioritize safety measures such as turning off the power from the main electrical panel and wearing protective gear like safety glasses and insulated gloves.
Changing an electrical outlet involves 6 steps, including turning off the power, removing the old outlet, wiring the new outlet correctly, installing the new outlet securely, and restoring power while conducting safety checks.
After replacing the outlet, perform post-installation safety checks to ensure everything is secure and functioning correctly. This includes visually inspecting the outlet, checking connections, testing GFCI/AFCI outlets, and maintaining long-term outlet care.
Implementing regular maintenance practices, such as inspecting outlets for wear or damage, replacing outlets every 15 to 20 years, using surge protectors, and avoiding overloading outlets, helps ensure the safety and effectiveness of the electrical system.
Safety should always be the top priority. Understanding the process, following safety procedures, and conducting regular maintenance contribute to improving the quality and safety of the home's electrical infrastructure.
Safety Precautions and Tools for Replacing Wall Outlet
Although changing outlets is a frequent DIY undertaking, electrical safety must always come first. The crucial safety measures and required equipment are to be considered in this section to help prepare for electrical outlet replacement.
Safety Measures
Turn Off the Power: From the main electrical panel, turn off the power to the circuit you'll be working on before you do anything else. Using a voltage tester, verify that the outlet is not carrying any electricity.
Wear Protective Gear: To safeguard yourself from any potential electrical accidents, wear the proper protective gear, such as safety glasses and insulated gloves.
Clear the Workspace: Make enough room to comfortably work by removing any impediments from the area surrounding the outlet. Accidents are reduced in a clean work environment.
Working Alone: When working alone, ensure someone is informed of your whereabouts in an emergency. It's a good idea to have a phone close by.
Necessary Tools
Screwdrivers: To remove the outlet cover and fasten the new one, you'll need a set of flathead and Phillips screwdrivers.
Wire strippers: To remove the electrical wires' insulation, use wire strippers. When connecting them to the new outlet, this is helpful.
Wire Nuts: Wire nuts are used to firmly fasten wires together. These are necessary for securely attaching the new outlet to the electrical wiring.
Voltage Tester: Before fixing the outlet, use a voltage tester to ensure there is no electrical current flowing through it.
Outlet Tester: After the repair is finished, an outlet tester helps confirm that the wiring is correct.
Outlet Box and Mounting Screws: To guarantee a secure installation, consider replacing them if the electrical box or mounting screws are worn out or broken.
Insulated Pliers: Use insulated pliers to handle wires and create reliable connections without running the danger of electrical shock.
Electrical tape: It is used for protecting wire connections from contact with other wires, metal elements of the outlet, and each other.
Safety Step Stool or Ladder: Depending on the height of the outlet, you may need to use a step stool or ladder to reach it securely.
Non-Contact Voltage Detector: Electrical voltage may be detected with a non-contact voltage detector, adding an extra security measure.
Changing electrical outlets may be a do-it-yourself project, but it necessitates close attention to safety precautions and access to the proper tools. You can guarantee a successful and secure electrical outlet replacement by following these safety considerations and utilizing your DIY toolkit.
A skilled electrician should always be consulted if you have any doubts about any part of the procedure and have outlet replacement gear to prevent any potential risks.
Identifying the Outlet Type
Understanding the sort of outlet classification you have and how it operates is explicitly crucial for electrical safety.
The most typical electrical outlet types, such as standard, GFCI (Ground Fault Circuit Interrupter), and AFCI (Arc Fault Circuit Interrupter) outlets, are included in this section, which will help you recognize your electrical outlet type:
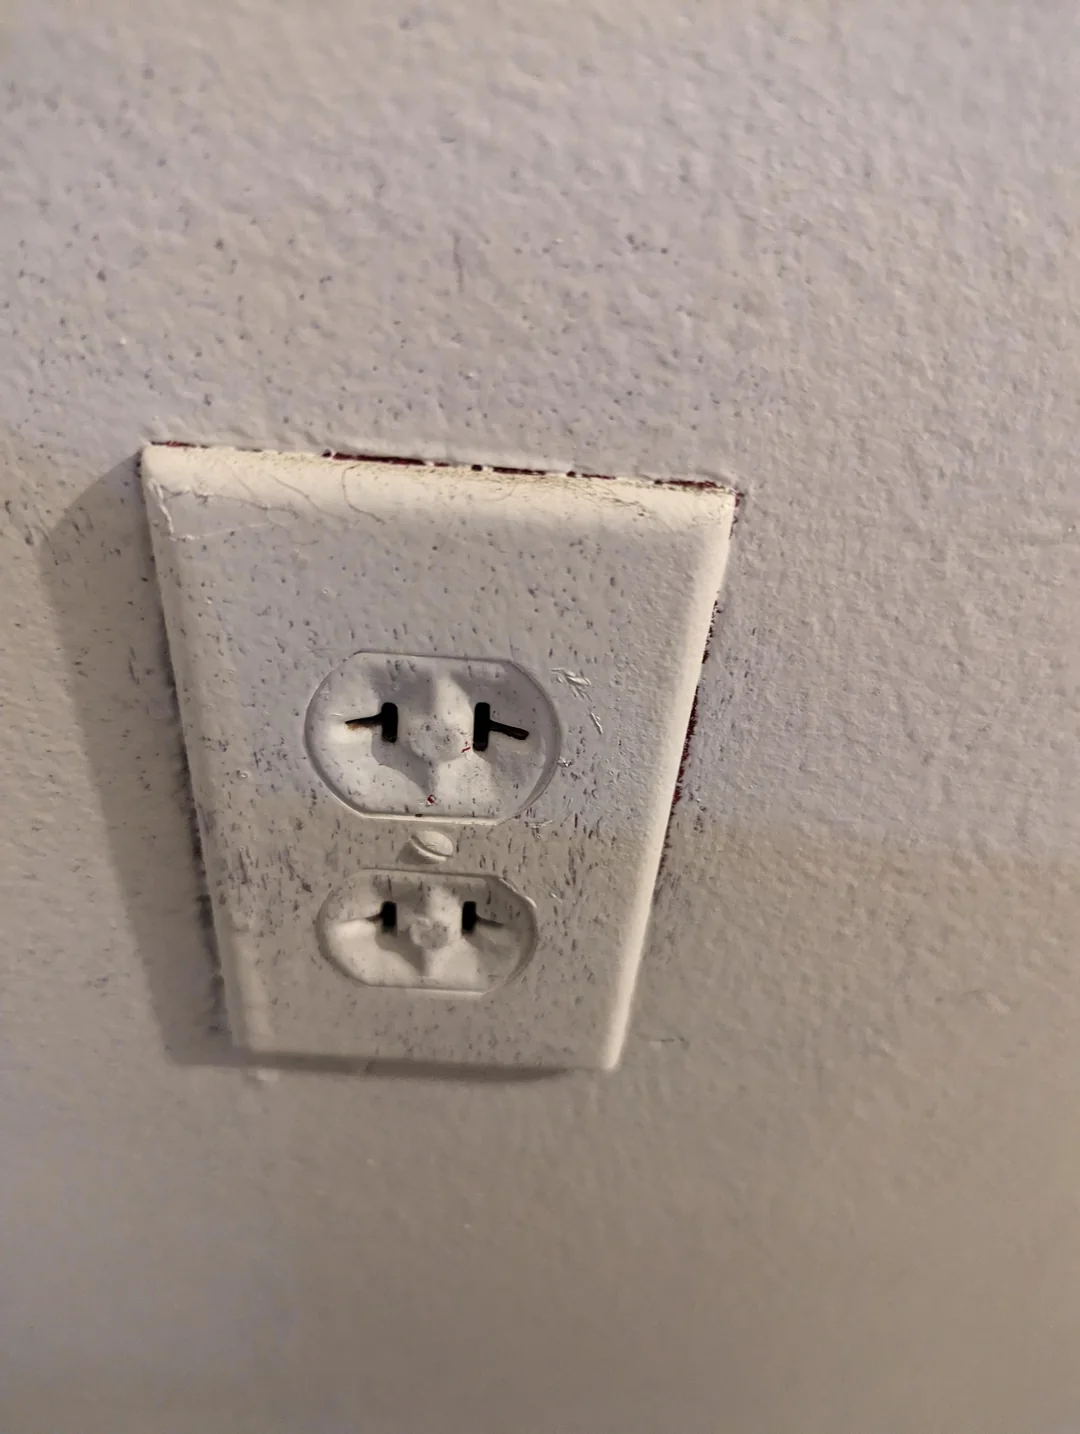
Standard Electrical Outlet
Appearance: A round or U-shaped grounding hole and two vertical slots are features of standard outlets.
Usage: Most households have these outlets, which are used for standard electrical gadgets and appliances.
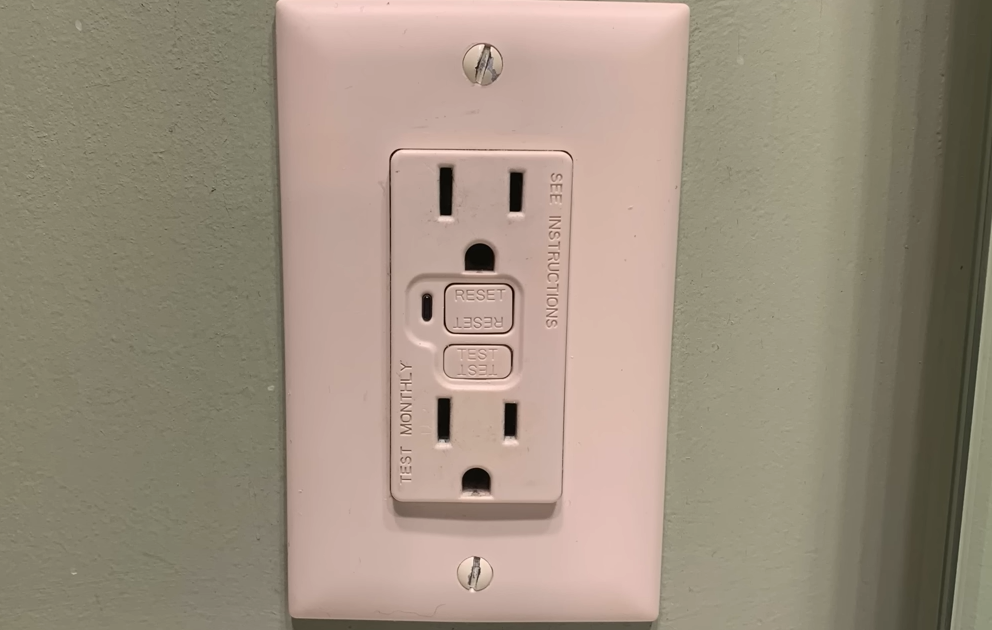
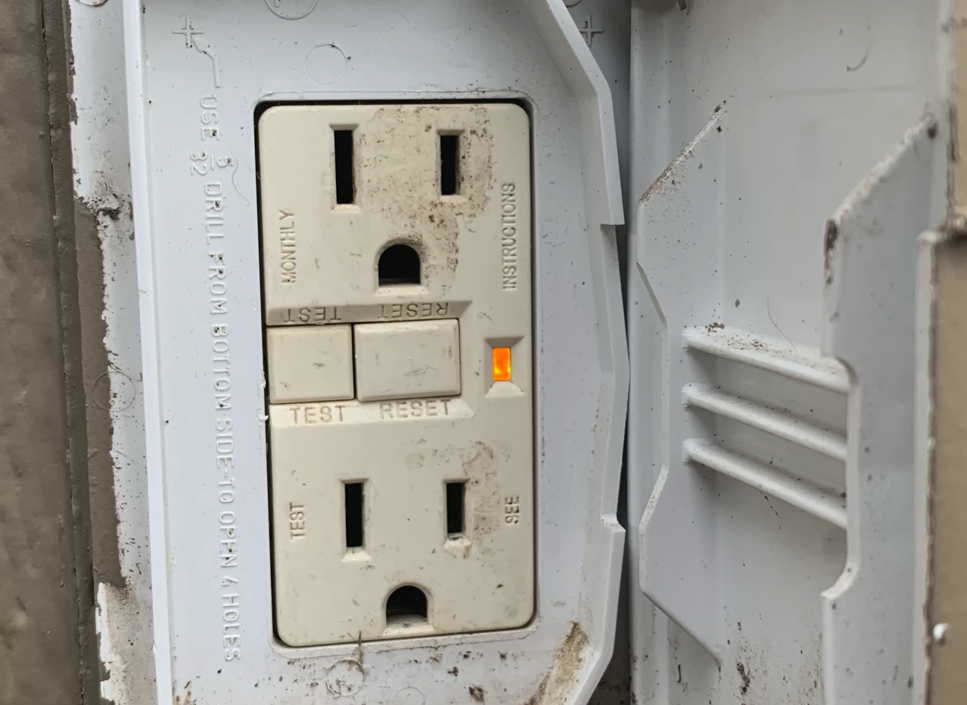
GFCI Outlet (Ground Fault Circuit Interrupter)
Appearance: GFCI outlets appear like regular outlets, except they contain two middle buttons labeled "Test" and "Reset."
Usage: GFCIs are frequently used in wet and dry places, such as bathrooms, kitchens, and outdoor spaces. They offer shock safety by turning off electricity whenever a ground fault is found.
AFCI Outlet (Arc Fault Circuit Interrupter)
Appearance: Although they resemble normal outlets, AFCI outlets have a test button. In some instances, an electrical panel circuit breaker serves as the AFCI protection.
Usage: AFCI outlets are frequently found in living rooms, bedrooms, and other common areas. They are made to identify and mitigate arc faults to stop electrical fires.
How to Identify Your Outlet Type
Check the outlet directly: Check its face to see if it exhibits the distinguishing characteristics listed above for each kind.
Verify the area: An indicator may be the outlet's placement. While AFCI outlets are typically located in living spaces and bedrooms, GFCI outlets are frequently found next to water sources.
Examine the buttons: A GFCI outlet has "Test" and "Reset" buttons. The outlet should be turned off when you press the "Test" button.
Consult a specialist: Consult an electrician if you're unsure about the type of outlet or whether you need to replace it. They may evaluate your electrical system and recommend safe, code-compliant outlets.
Knowing the type of electrical outlet in your home is essential for safety and gadget compatibility. You can efficiently maintain and update your electrical system by knowing the variations between normal, GFCI, and AFCI outlets.
When working with electrical outlets and electrical receptacles, always use caution and, if required, obtain expert advice before making any adjustments or replacements.
How to Change The Electrical Outlet (Broken to New Outlet Installation)
To update a damaged electrical outlet, switch off the power, remove the damaged outlet, install the new outlet, and secure it in place. Read on to find out more!
Turning Off the Power
It is imperative to ensure an electrical shutdown to the outlet before doing any work on it. The success of your electrical project and your safety depend on this stage.
We'll stress how crucial it is to safely disconnect the power in this conversation and walk you through safety protocols.
Safety Measures
Protect Yourself: Ensure your safety by wearing the proper clothing, such as insulated gloves and eyewear.
Clear Workspace: To maintain a secure and well-organized work area, ensure the area surrounding the outlet is clear of any obstructions or clutter.
Why Disconnect the Power?
Avoid Electrocution: By turning off the electricity, you can avoid electric shock, which poses a serious risk to your life.
Prevent Fires: Reduce the danger of electrical fires while working by turning off the power.
Turning Off the Power
Locate the Circuit: The circuit that powers the outlet you are working on can be found by looking for it. The electrical panel could be labeled with this.
Main Disconnect: If you can't isolate the circuit that supplies the outlet, you may occasionally need to turn off the main electricity to your house.
Using Safety Protocols:
Use a Voltage Tester: Use a voltage tester to ensure no electricity flows through an outlet before touching any wires or outlets.
Double-Check: Make sure the power is genuinely off by checking any nearby appliances or outlets.
Outlet Deactivation
You may start working on the outlet, whether it needs replacing, repairing, or any other maintenance once the power has been turned off.
Always use a voltage tester to verify the voltage again after turning off the power and before you begin operating.
Keep Others Informed: If you're working alone, make sure someone knows about your activity in case of an emergency. Having a phone within reach is a good safety practice.
When dealing with electrical systems, safely cutting off the power to an outlet is necessary. It safeguards you from injury, stops electrical fires, and ensures an electrical project is successful and secure. You can prevent mishaps and confidently operate your electrical outlets if you adhere to the safety precautions and guidelines.
11 Easy Steps for Removing the Old Outlet
Before installing a new electrical outlet, you need to remove the existing one safely and effectively. This step-by-step guide will walk you through detaching the old outlet from the wall.
Tools and equipment needed for taking out the old electrical outlet
Screwdriver (Phillips and flathead)
Voltage tester
Needle-nose pliers
Wire stripper
Electrical tape
Step 1: Switch the power off
Make sure the power to the outlet is switched off before you begin. Find the circuit breaker or fuse that governs the outlet at your electrical panel. To ensure there is no electricity going to the outlet, turn it off.
Step 2: Verify that the power is off
Use a voltage tester to ensure there is no electrical current in the outlet. Put the voltage tester into the slots for the outlets. It is safe to move forward if it doesn't beep or light up.
Step 3: Remove the outlet cover
The outlet's cover plate may be removed with a screwdriver. Remove the screw slowly and discard it. The outlet will become visible as a result.
Step 4: Remove the Outlet screw
The screws attaching the outlet to the electrical box should be located. Two screws are often used, one at the top and one at the bottom. To remove these screws, use a screwdriver.
Step 5: Gently remove the outlet
Do not yet cut any wires as you gently remove the outlet from the electrical box. Be careful not to harm the cables or the box when you pull it out.
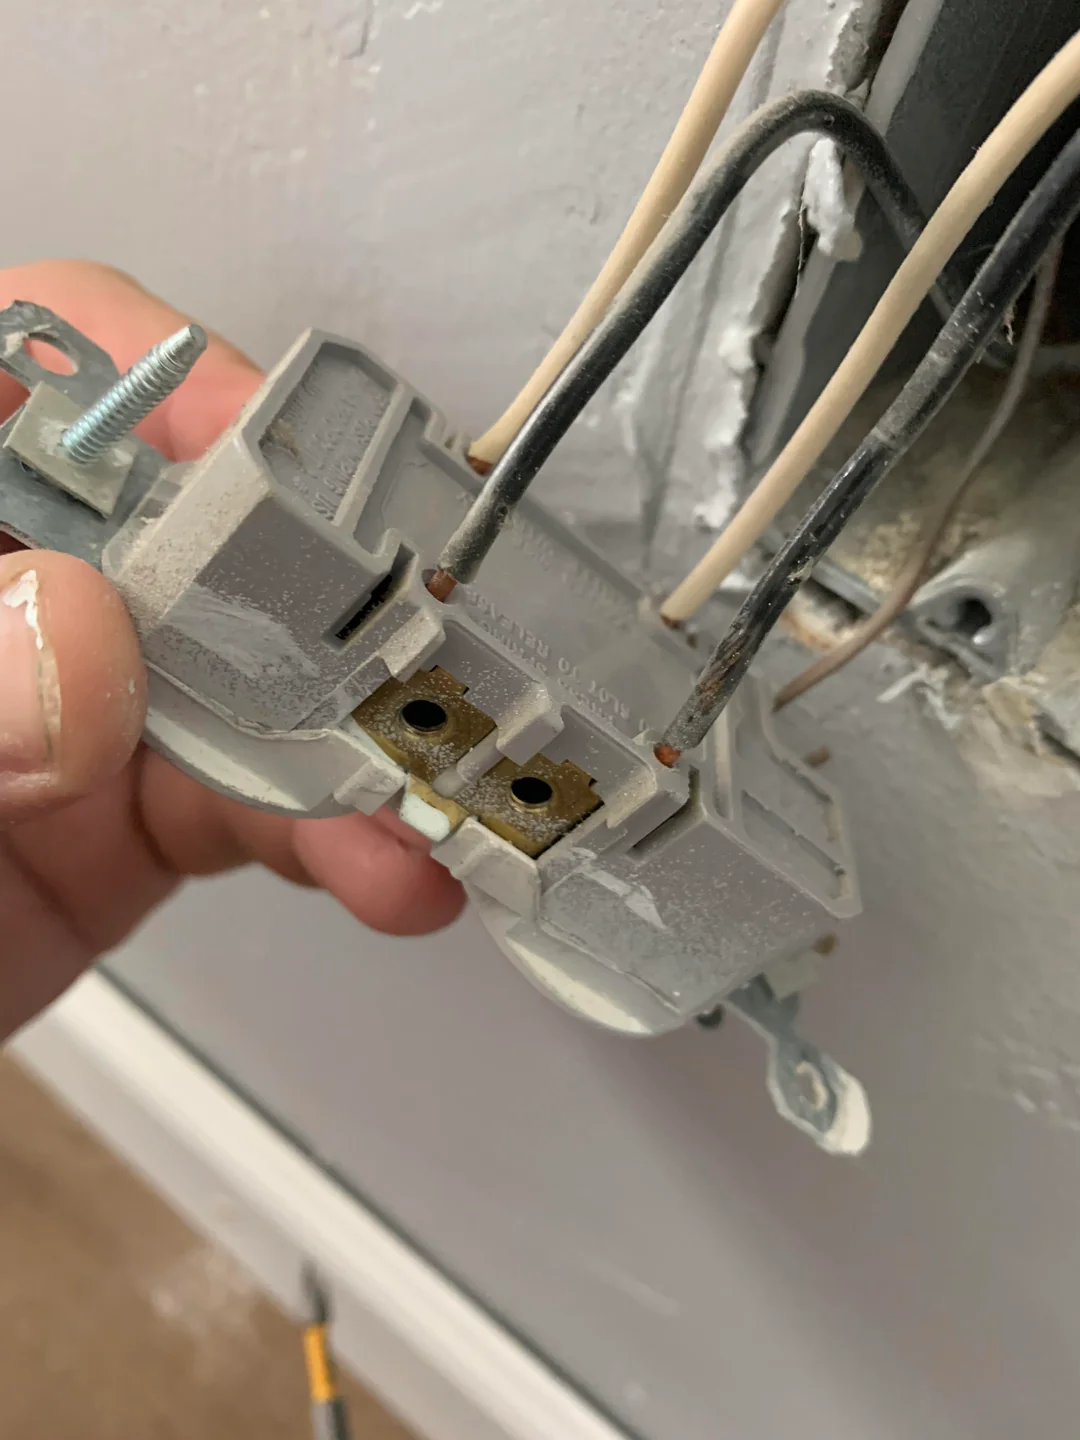
Step 6: Check the wires that are attached to the outlet
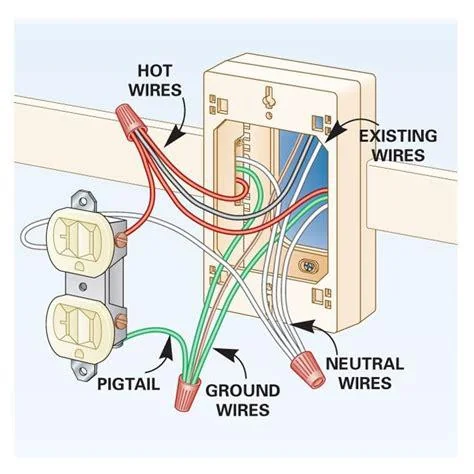
Black (hot), white (neutral), and green (bare) wires are the standard configuration. Note the connection that they have to the old outlet. You might want to snap a photo or make a diagram for reference.
Step 7: Unfasten and remove wires from the terminal screws on the outlet
Using a screwdriver or needle-nose pliers. The ground wire should come first, then the white (neutral) wire, and the black (hot) wire. To prevent harming the wires, take your time.
Step 8: Twist wire nuts
Twist wire nuts onto the exposed wire ends after removing the wires from the previous outlet to keep them from contacting other cables or metal surfaces.
Step 9: Apply electrical tape as insulation
Wrap electrical tape around the wire nut connections for an additional layer of insulation and wire protection.
Step 10: Remove the old outlet from the wall
You may remove the old outlet from the wall once the wires have been properly sealed and insulated. Slide it out carefully, then put it aside.
Step 11: Verify the wires again
Ensure the connections are secure, and the cables are in excellent condition before adding a new outlet. Before continuing, you should fix any broken wires or shoddy connections that you find.
The disconnection process is now complete! The old electrical outlet has been successfully removed from the wall. If more outlets are required, you may install them or carry out any other required upkeep or repairs. Remember to always adhere to safety precautions for the wall outlet removal process.
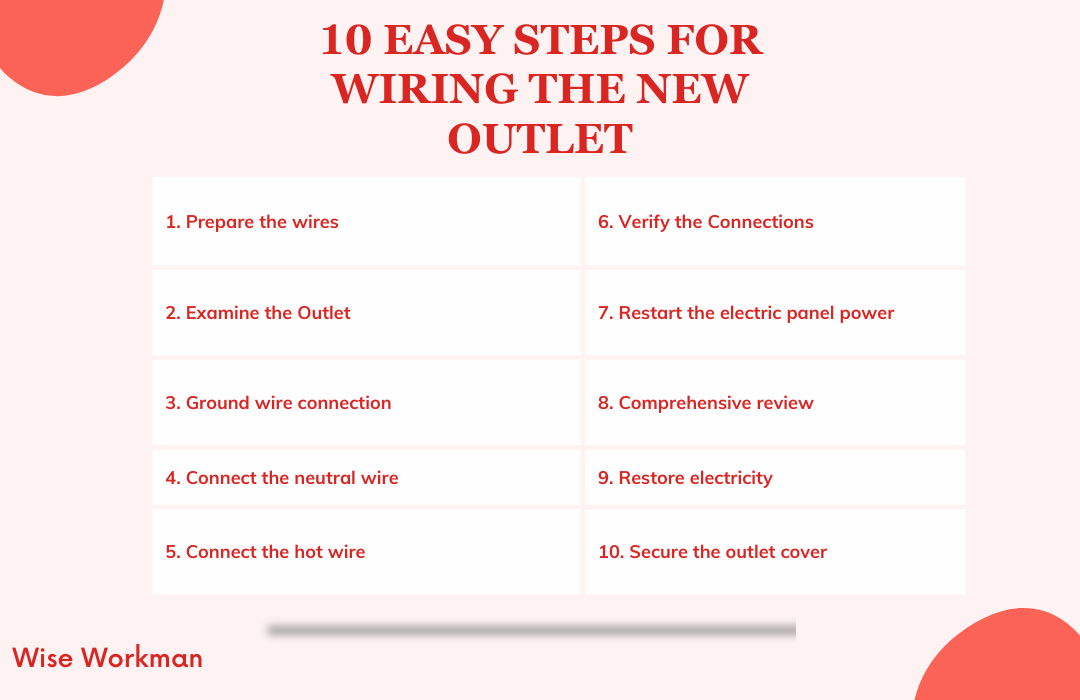
10 Easy Steps for Wiring the New Outlet
A new one must have the correct electrical wiring for functionality and safety. You may carefully wire the new outlet using the extensive instructions in this section, ensuring wiring accuracy.
Tools and Equipment Needed for Outlet Connection:
Screwdriver (Phillips and flathead)
Wire stripper
Needle-nose pliers
Voltage tester
New electrical outlet
Electrical tape
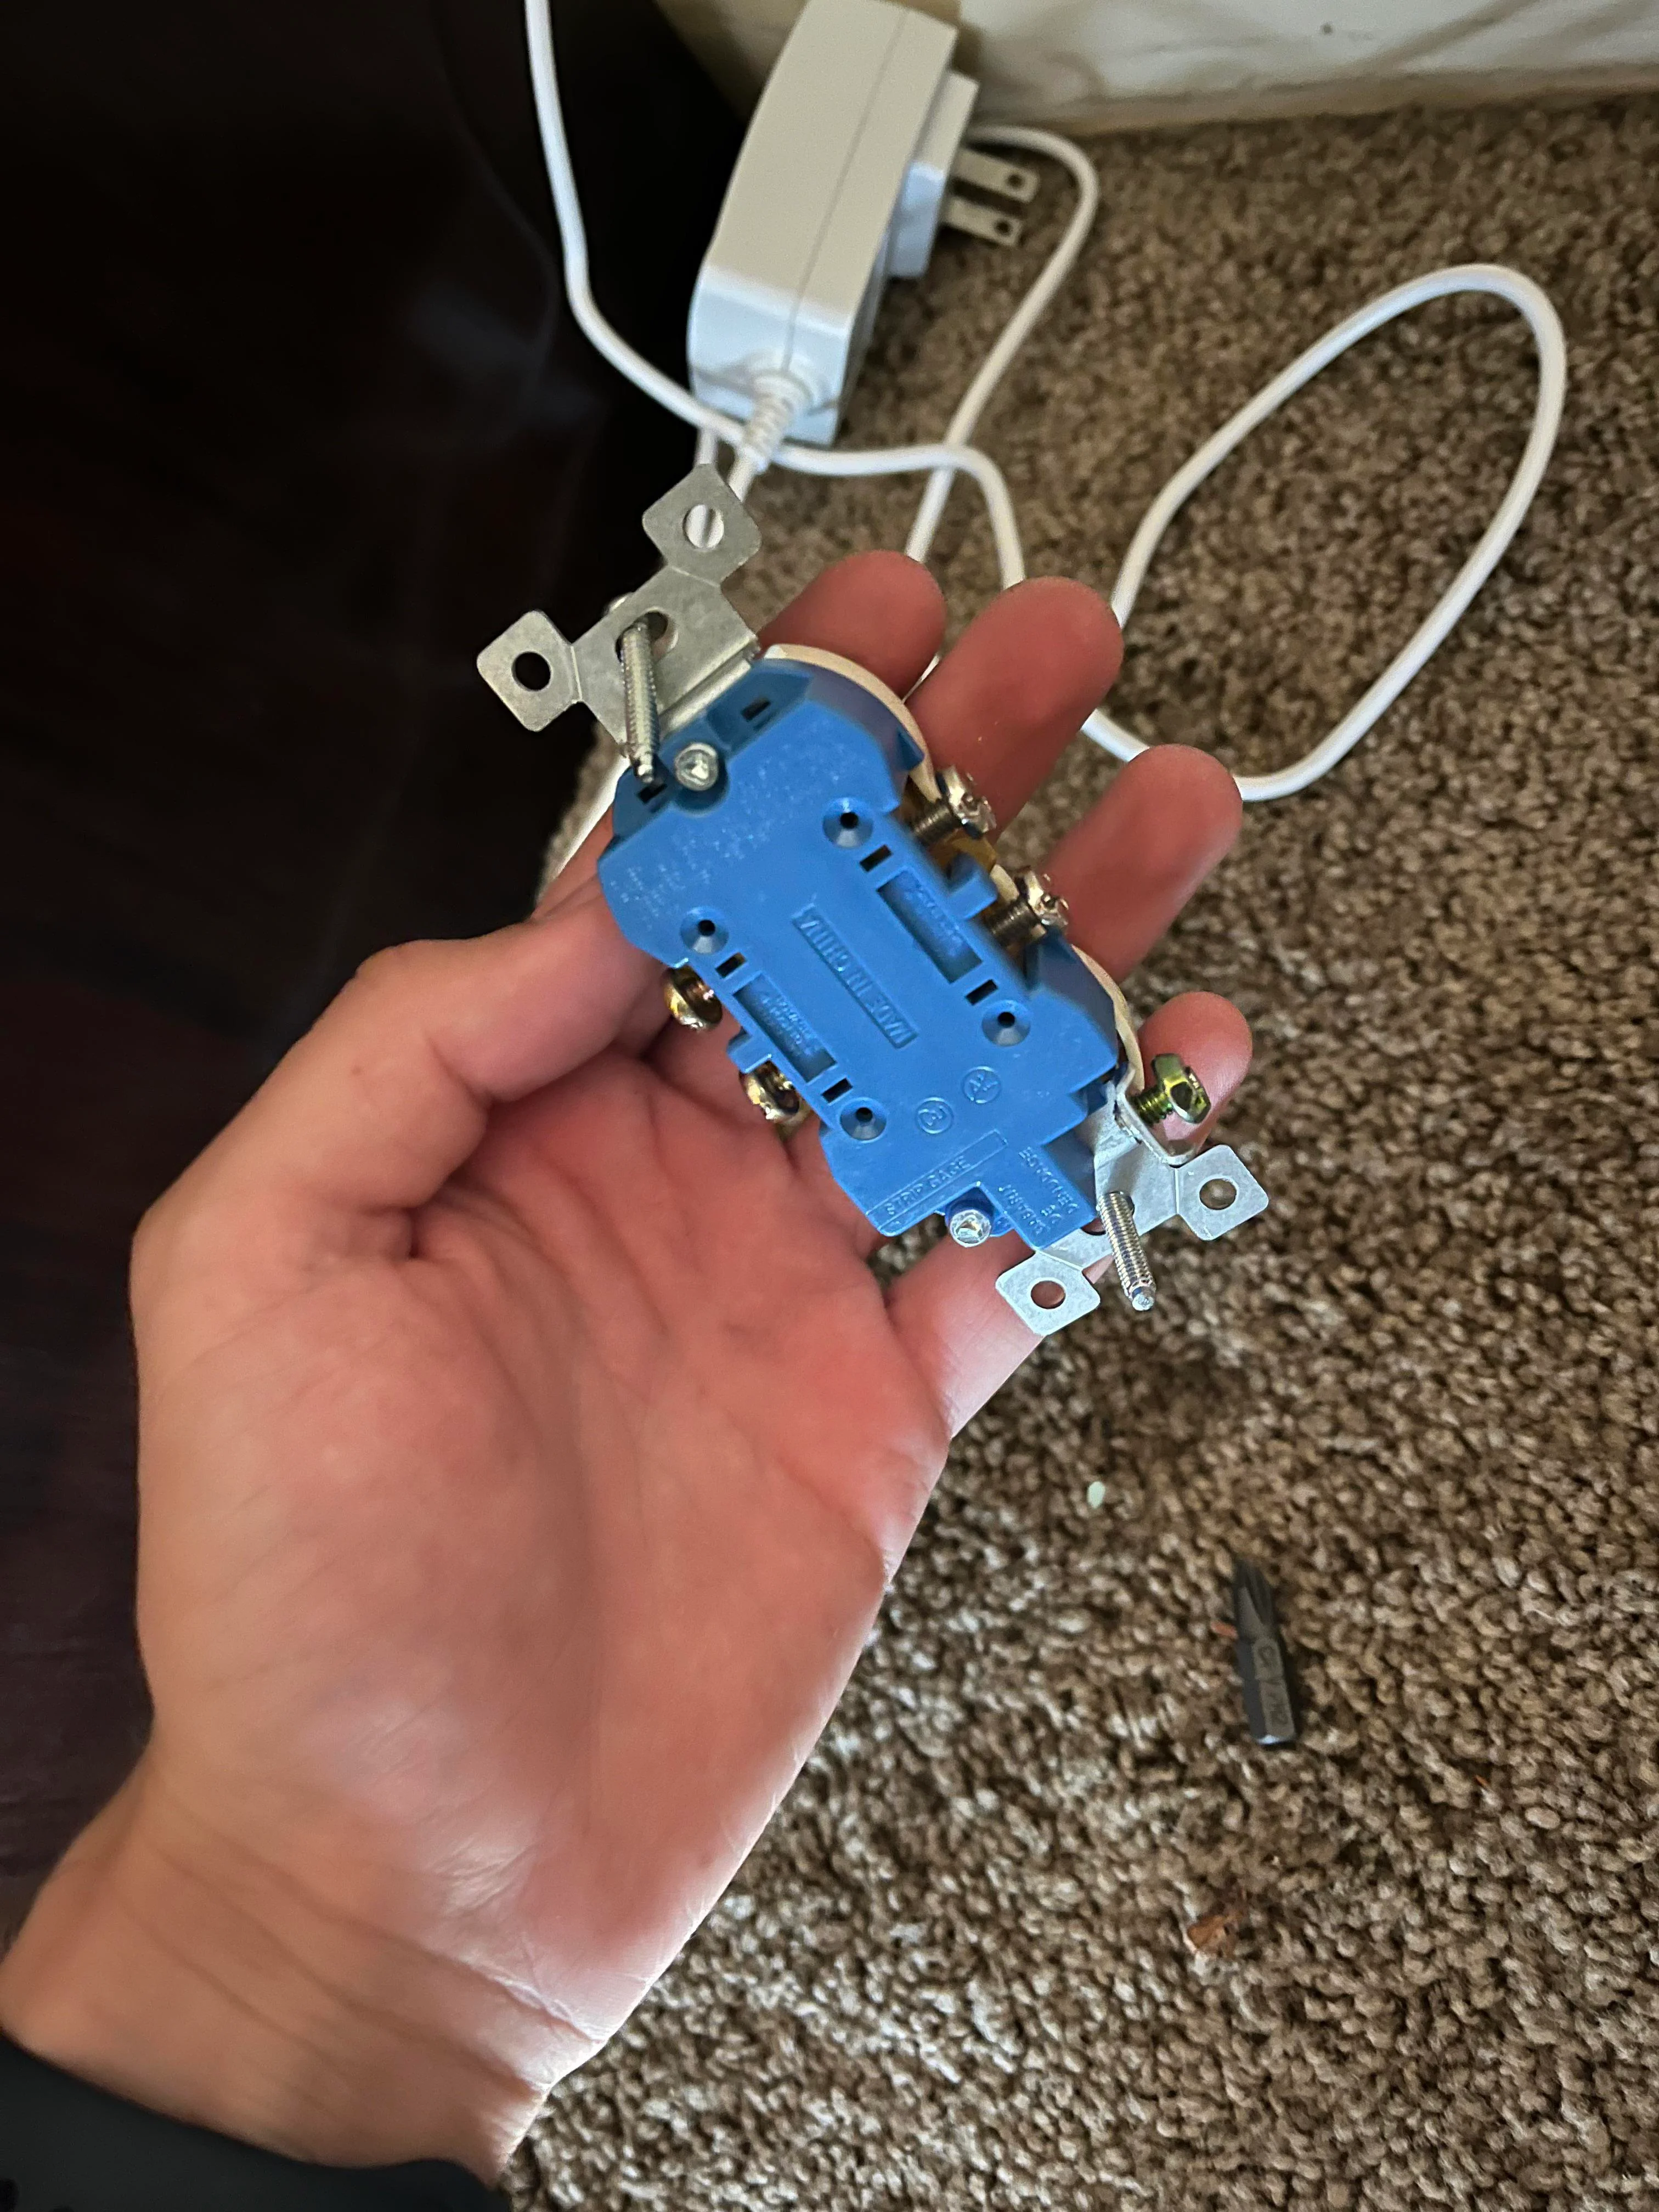
Step 1: Prepare the wires
Before wiring the new electrical outlet, prepare the wires by ensuring they are clean, undamaged, and stripped to the proper length. Black (hot), white (neutral), and green (bare) cables should be your three wires.
Step 2: Examine the Outlet
Inspect the new outlet to identify the following:
Terminal screws: Typically, the hot wire has two brass screws, the neutral wire has two silver screws, and the ground wire has a green screw.
Terminals marked "Line" and "Load" (for GFCI or AFCI outlets): The "Line" and "Load" connections on certain outlets may be for incoming power and the downstream outlets, respectively.
Step 3: Ground wire connection
To the green screw on the outlet, screw the green or bare ground wire. Secure the wire by securely wrapping it around the screw clockwise.
Step 4: Connect the neutral wire
To the outlet's silver terminal screw, attach the white neutral wire. The wire should be coiled around the screw in the same manner as the ground wire to make sure it is securely fastened.
Step 5: Connect the hot wire
Connect the black hot wire to the outlet's brass termination screw. Rewind the wire clockwise around the screw and firmly tighten it.
Step 6: Verify the Connections
Check all your connections are tight and secure by checking them again. To ensure each wire is tightly fastened, give it a little twist. Electrical dangers and overheating can result from loose connections.
Step 7: Restart the electric panel power
Restart the electrical panel's power and check the outlet with a voltage tester to see whether it is live. Move on to the following step if it isn't. If so, check your wiring again and shut off the power again.
Step 8: Comprehensive review
Once the outlet has been properly wired and verified to be live, carefully tuck the wires into the electrical box. Using the included screws, fasten the outlet to the box. Place the outlet cover plate in place.
Step 9: Restore electricity
Restore electricity and test the outlet with a device like a light or phone charger after installing the outlet cover plate. Make sure it performs as planned. If using a multi-outlet circuit, test each outlet individually.
Step 10: Secure the outlet cover
Onto the wall, screw the outlet cover plate. Make sure it's secure but not too tight.
Following these steps means you will have installed the new electrical outlet properly, ensuring all the connections are sound and safe.
Always use caution when dealing with electrical systems and adhere to best practices since safety is paramount. If you're unsure about your skills, consider asking a licensed electrician for help.
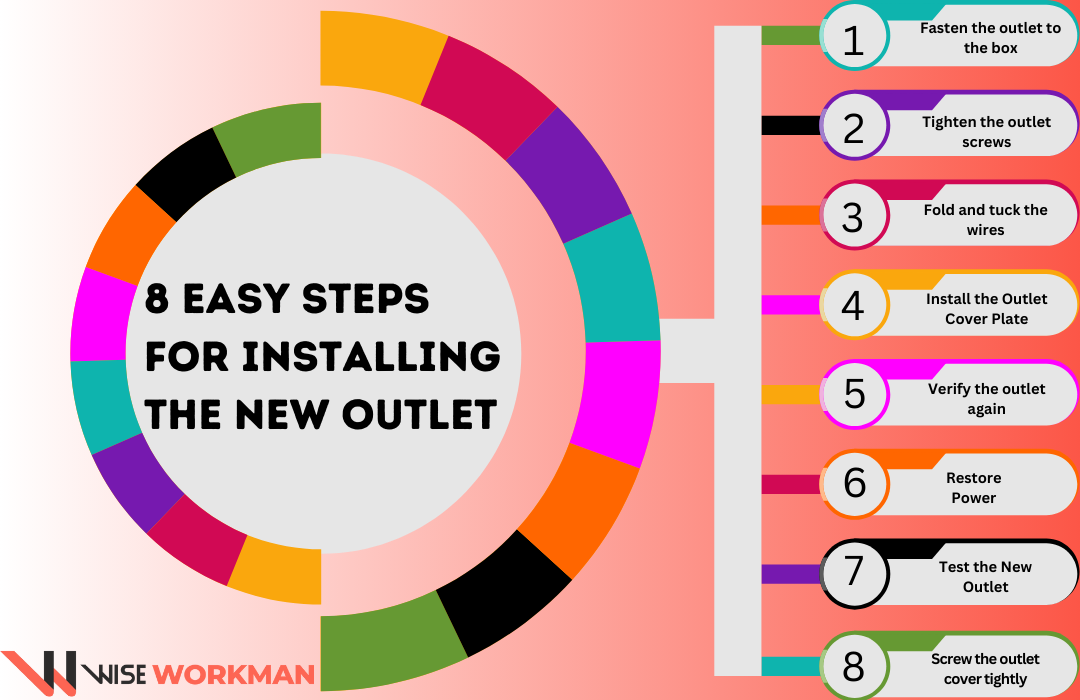
8 Easy Steps for Installing the New Outlet
The last stage in the procedure is to install a new electrical outlet, which is very important to secure securely. You can follow the instructions in this article to mount and install the new outlet fixture securely.
Tools and equipment needed for installing your new outlet
Screwdriver (Phillips and flathead)
Electrical outlet
Outlet cover plate
Outlet box (if replacing the old one)
Screws
Step 1: Fasten the outlet to the box
Place the electrical outlet in front of the electrical box, making sure that the wires go through the holes in the outlet that are assigned to them.
Align the electrical box's holes with the screw holes on the outlet. Screws should be used to fasten the outlet to the box. Once the outlet is firmly in position, tighten the screws.
Step 2: Tighten the outlet screws
Carefully tighten the outlet screws so that the outlet is flat against the wall. Avoid overtightening the outlet or the wall at all costs.
Step 3: Fold and tuck the wires
Fold and tuck the wires neatly into the electrical box. Ensure the cables don't obstruct the cover plate or the outlet's location.
Step 4: Install the Outlet Cover Plate
Align the screw holes on the electrical box with the holes on the outlet cover plate.
Insert screws through the holes in the cover plate and into the electrical box to firmly fasten it.
Once the plate is snug, tighten the screws.
Step 5: Verify the outlet again
Pull on the outlet and cover plate to ensure they are firmly secured to the wall.
Check the outlet for any indications of wear and tear, loosened connections, or exposed wires.
Step 6: Restore Power
When you are certain that the outlet is firmly placed and that all connections are accurate. Turn the power back on at the electrical panel.
Step 7: Test the New Outlet
Check if the new outlet operates as it should by plugging in a device or using a voltage tester. If you're working on a multi-outlet circuit, test each outlet.
Step 8: Screw the Outlet Cover Tightly to the Wall
If the outlet is operating properly, complete the installation by fastening the outlet cover plate firmly to the wall. Make sure it is snug but not too tight.
The final installation of your new electrical outlet has been set up and secured with success. Your gadgets and appliances should now be able to receive electricity from the outlet because it should be secure and working.
During the installation and mounting of the outlet procedure, use caution and ensure that all connections are safe and adequately insulated. Consult a licensed electrician for advice if you have any questions or uncertainties.
8 Easy Steps For Restoring Power and Testing
It's crucial to ensure a new electrical outlet works properly after a successful installation through outlet testing and a functionality check. You can follow the instructions in this section to re-establish electricity, go through electrical outlet validation, and make sure it functions as it should.
Tools and Equipment Needed:
Voltage tester
Electrical devices or appliances (e.g., lamps, phone chargers)
Step 1: Restore Power
Go to your electrical panel and switch on the circuit breaker or fuse that regulates the outlet you just placed.
Step 2: Test for Voltage
Check the outlet for power using a voltage tester. The outlet is powered if the tester illuminates or beeps after being inserted into the outlet slots.
If the voltage tester shows power, shut off the circuit breaker or fuse and examine your wiring connections again to ensure they are secure and proper.
Before continuing, make any required alterations or corrections.
Step 3: Test the Outlet with a Device
Insert an appliance or gadget into the outlet, such as a light or phone charger.
Switch the gadget on to ensure it receives electricity and operates as intended.
Immediately shut off the power at the electrical panel if the appliance isn't working or if the outlet appears to be overheating before checking the wiring and connections for problems.
Step 4: Test Multiple Outlets (if applicable)
If you've changed an outlet as part of a multi-outlet circuit, ensure all the other outlets are working correctly by testing them all.
Connect gadgets to each outlet and check that they work.
Step 5: Secure the Outlet Cover
Screw the outlet cover plate to the wall. Make sure it is snug but not too tight.
Step 6: Final Inspection
Conduct one last visual check to ensure all cables are neatly tucked away, the outlet is firmly fixed, and there are no exposed wires or weak connections.
Step 7: Document Your Work
Keeping a record of the installation, testing, and any notes or modifications made during the procedure.
If you need to contact an electrician in the future or for future reference, this paperwork may be helpful.
Step 8: Restoring Power to Other Areas (if applicable)
Restore power to the other regions by tripping the appropriate circuit breakers or changing the fuses if you have shut off power to several circuits for your project.
Verifying the outlet's functionality has been successfully achieved. Make sure that the outlet not only delivers electricity but also does it securely and without any problems. When dealing with electrical systems, always use caution and safety procedures, and seek expert assistance if you run into issues or have any questions.
Safety Checks and Final Tips
Post-Installation Safety and Maintenance
To guarantee your electrical system's continuous safety and effectiveness after repairing or installing electrical outlets, it's crucial to carry out post-installation safety tests and be knowledgeable about long-term maintenance procedures. These topics are covered in this conversation in great detail.
Post-Installation Outlet Safety Checks:
1. Visual Inspection
Make sure to give the new outlets a complete visual check after installation. Make sure that all cables are securely fastened and have no exposed conductors.
Examine the area surrounding the outlet, cover plate, and electrical box for any damage or indications of overheating. If you come across any problems, fix them right away.
2. Tightness of Connections
Check the outlet connections again to make sure they are firmly connected. Ensure all connections are tight but not overtightened because loose connections might cause electrical issues.
3. GFCI/AFCI Testing (if applicable)
Test your new outlets as part of your safety inspections if they are Ground Fault Circuit Interrupter (GFCI) or Arc Fault Circuit Interrupter (AFCI) outlets. To make sure they trip, press the "Test" button, and to restart the power, press the "Reset" button.
4. Voltage Testing
Use a voltage tester to ensure the outlet is working properly and supplying the right voltage. Uneven voltage may be a sign of problems with the connections or wiring.
5. Cover Plate Security
Inspect the outlet cover plate to make sure it is firmly secured. Cover plates that are loose or have been placed incorrectly might be dangerous.
Long-Term Maintenance Tips for Outlet Care
1. Regular Inspections
Check your home's outlets for wear, corrosion, or overheating symptoms. This is particularly crucial in wet environments like bathrooms and kitchens.
2. Outlet Replacements
Replace outlets every 15 to 20 years or sooner if they show indications of damage or wear. Unsafe outlets can compromise safety.
3. Childproof Outlets
Install tamper-resistant outlets if you have children or intend to in the future. These outlets have a safety feature that makes it harder for kids to put things that aren't theirs.
4. Weatherproof Outlets (for outdoor use)
Buy weatherproof covers for your outdoor outlets to protect them from the elements. To make sure they are still intact, occasionally inspect these coverings.
5. Surge Protection
Consider placing surge protectors on crucial outlets to protect your delicate electronic gadgets from power surges and voltage spikes.
6. Avoid Overloading Outlets
Avoid plugging in too many appliances or devices at once. Surge protectors and power strips can be used to securely spread the load.
7. Consult a Professional
Consult a licensed electrician if you frequently suffer electrical problems like flickering lights or tripped circuits. These abnormalities might be a sign of underlying electrical concerns.
Post-installation safety maintenance is essential to guarantee the security and dependability of your electrical outlets.
Your home's electrical system will be safer and more effective if you do routine inspections, use caution, and replace worn-out components when necessary. Always put safety first, and seek expert advice if you have any questions or concerns.
Conclusion
The conclusion on changing electrical outlets is that it is an essential component of house maintenance that improves convenience and safety. Homeowners may take immediate action to fix problems and ensure the dependability of their electrical infrastructure by having a complete grasp of the replacement procedure.
To recap the replacement process the most important factor during this procedure is safety, though. Always start by shutting off the power properly, then conduct inspections, secure connections, and check operation. It is important to be vigilant about following safety procedures since doing so reduces risks and fosters mental stability.
The replacement of electrical outlets is a necessary DIY project, but only when it is carried out with a deep understanding of the importance of safety can it genuinely improve the quality of your house and everyday life.
Therefore when pondering over how to change the electrical outlet in your home, make sure you keep electrical outlet safety in mind before taking the first steps!
 Author: Howard Griner | Updated on March 11, 2024